
3 Beginner Crochet Coaster Patterns
Looking for fun and easy crochet coaster patterns? I’ve got you covered with three beautiful crochet coaster patterns perfect for all skill levels! These easy crochet patterns use different stitches to add variety and texture.
Whether you’re looking for an easy project to whip up quickly or want to try something new, these simple coasters are just the thing. Plus, each free pattern will look amazing on your coffee table and add a cozy aesthetic to your home decor. Each free crochet coaster pattern is below.

Coasters Make Great Yarn Stash Busters!
Crochet coasters are the perfect pattern for using up scrap yarn. They’re small and quick, so you can work through your yarn stash in no time! If you have extra yarn lying around, coasters are a great way to give it new life.
These mug rugs and square coasters don’t need much yarn, making them ideal for diy projects. Plus, they’re the best coasters for protecting surfaces from cold drinks while keeping your table cozy and stylish.
Coasters Make Great Gifts!
A crochet coaster set makes a great gift for any occasion. These easy crochet coaster patterns are a last-minute giftthat’s thoughtful and practical. Perfect for a handmade gift, coasters are a quick project you can finish fast.
They’re just the thing to pair with a cozy mug as a diy home decor item. With these coasters, your friends and family will have the best yarn decor for their coffee table!
Crochet Coaster Patterns Information
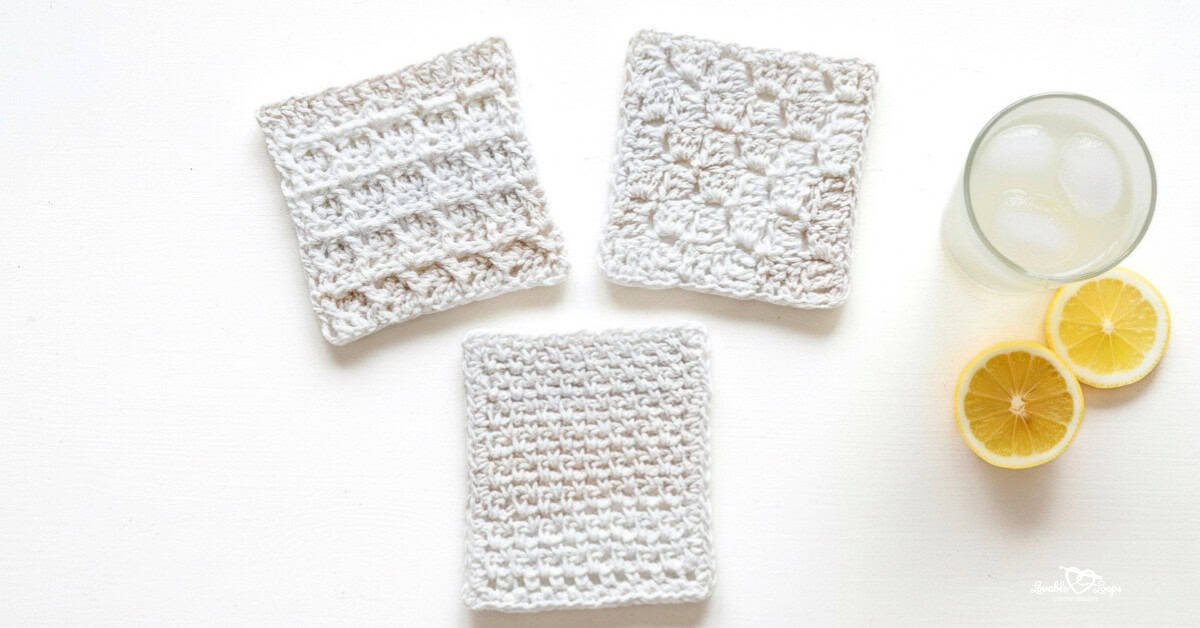
These easy crochet coasters are a great beginner project because they use basic stitches and each pattern comes with step by step photo tutorials for the moss stitch, waffle stitch, and c2c stitch.
New crocheters can learn from the detailed instructions, and more experienced crocheters will enjoy the variety. This crochet coaster set is a quick project for all skill levels, making it a fun way to expand your crochet skills or enjoy a relaxing project.
Skill Level
These crochet coaster patterns are beginner friendly.
Crochet Project Materials Needed
- Crochet hook size: H-8 5 mm crochet hook
- Yarn: Worsted weight yarn #4. I used Peaches & Creme Stripey cotton yarn in the color Linen. Lily’s Sugar ‘n Cream is another great option. You only need one skein of yarn to make a set of four coasters.
- Yarn needle: Use this to weave in your ends.
- Scissors: Use scissors to fasten off your yarn.
- Stitch markers: Optional. Use these to help keep track of your stitches.
Crochet Gauge
Gauge is not important for the easy crochet coaster pattern(s).
Crochet Coaster Patterns Finished Size
The square coasters measure 4 inches by 4 inches.
Crochet Terms
Each free crochet pattern is written in US Terms.
- dc = double crochet
- sc = single crochet stitch
- inc = increase
- st/sts = stitch/stitches
- ch/chs = chain/chains
- sl st = slip stitch
- ch sp = chain space
- rnd/rnds = round/rounds
- rem = remaining
- FPdc = front post double crochet
Crochet Coaster Patterns Instructions
Make 4 of each for a set of coasters.
Waffle Stitch Coaster Pattern

Pattern Notes
- The beginning chain counts as your first dc.
- FPdc stitch: You don’t work into the top loops of the stitch like you normally would. Instead, you will work around the post (the vertical part) of the stitch from the front side. This creates a raised effect on the front side of the fabric.


Row 1: Ch 20, dc in 4th ch from hook and in each rem ch, ch 3 and turn.
Row 2: *FPdc in next st, dc in next 2 sts, repeat from * to last 2 sts where you will work a FPdc in the next st and a dc in the ch sp. Ch 3 and turn.
Row 3: *dc in next st, FPdc in next 2 sts, repeat from * to last 2 sts where you will work a dc in the next st and a dc in the ch sp. Ch 3 and turn.
Row 4: Repeat row 2.
Row 5: Repeat row 3.
Row 6: Repeat row 2.
Row 7: Repeat row 3.
Row 8: Repeat row 2.
Row 9: Repeat row 3. Do not make a chain at the end of the row. Instead, fasten off and weave in your ends.
C2C Stitch Coaster Pattern

Pattern Notes
- Corner to corner (c2c) crochet is a technique where you crochet “squares” in diagonal rows. You start in the bottom right corner and end in the top left corner.
- You will begin decreasing at the beginning of row 7.


Row 1: Ch 6, dc in 4th ch from hook and in each rem ch, ch 6 and turn. (1 square)
Row 2: dc in 4th ch from hook and in each rem ch, join with a sl st to the ch sp in the square from row 1, ch 3 + 3 dc, ch 6 and turn. (2 squares)
Row 3: dc in 4th ch from hook and in each rem ch, join with a sl st to the first ch sp, ch 3 + 3 dc, join with a sl st to the last ch sp, ch 3 + 3 dc, chain 6 and turn. (3 squares)
Row 4: dc in 4th ch from hook and in each rem ch, join with a sl st to the first ch sp and ch 3 + 3 dc, join with a sl st to the next ch sp and ch 3 + 3 dc, join with a sl st to the last ch sp and ch 3 + 3 dc, chain 6 and turn. (4 squares)
Row 5: dc in 4th ch from hook and in each rem ch, join with a sl st to the first ch sp and ch 3 + 3 dc, [join with a sl st to the next ch sp and ch 3 + 3 dc] 2 times, join with a sl st to the last ch sp and ch 3 + 3 dc, chain 6 and turn. (5 squares)
Row 6: dc in 4th ch from hook and in each rem ch, join with a sl st to the first ch sp and ch 3 + 3 dc, [join with a sl st to the next ch sp and ch 3 + 3 dc] 3 times, join with a sl st to the last ch sp and ch 3 + 3 dc, turn. (6 squares)
You will now begin your decrease rows.

Row 7: Slip stitch across the tops of the 3 dc’s from the last square made, join with a sl st to the first ch sp and ch 3 + 3 dc, [join with a sl st to the next ch sp and ch 3 + 3 dc] 3 times, join with a sl st to the last ch sp and ch 3 + 3 dc, turn. (5 squares)
Row 8: Slip stitch across the tops of the 3 dc’s from the last square made, join with a sl st to the first ch sp and ch 3 + 3 dc, [join with a sl st to the next ch sp and ch 3 + 3 dc] 2 times, join with a sl st to the last ch sp and ch 3 + 3 dc, turn. (4 squares)
Row 9: Slip stitch across the tops of the 3 dc’s from the last square made, join with a sl st to the first ch sp and ch 3 + 3 dc, join with a sl st to the next ch sp and ch 3 + 3 dc, join with a sl st to the last ch sp and ch 3 + 3 dc, turn. (3 squares)
Row 10: Slip stitch across the tops of the 3 dc’s from the last square made, join with a sl st to the first ch sp and ch 3 + 3 dc, join with a sl st to the last ch sp and ch 3 + 3 dc, turn. (2 squares)
Row 11: Slip stitch across the tops of the 3 dc’s from the last square made, join with a sl st to the first ch sp and ch 3 + 3 dc, join with a sl st to the last ch sp. (1 square)
Do not fasten off. You will now make the border.
Border: ch 1, work 2 sc in the side of each square and in each corner you will work sc, ch 1, sc.
Moss Stitch Coaster Pattern

Pattern Notes
- Make all single crochet stitches in the chain spaces beginning in row 2.
- The beginning chain counts as your first sc.

Row 1: Ch 20, sc in the 4th ch from hook, *ch 1, skip the next ch, sc in the next ch, repeat from * to the end. You will end with a sc in the last ch. Ch 2 and turn.
Row 2: sc in the first ch sp, ch 1, skip the next st,* sc in the next ch sp, ch 1, skip the next st, repeat from * to the end of the row. Your last sc will go in the ch sp. Ch 2 and turn.
Rows 3- 19: Repeat row 2. Do not fasten off after your last row. You will now make the border.
Border: Ch 1. When working along the left and right sides, make a sc in the side of each row. When working along the top and bottom, make a sc in each st and each ch. In each corner you will work sc, ch 1, sc.
Finishing the Crochet Coaster Patterns
Fasten off and then weave in the ends.

Crochet coaster patterns
Looking for more small projects to make for your home? Browse my favorite crochet coaster patterns, including cute, quick, and practical designs for everyday use, holidays, gifts, and table decor.
You can also visit my full collection of home decor crochet patterns for even more handmade ideas to decorate every season.
Let’s connect!
I’d love to see what you’re making! Share your finished project and follow along for more free crochet patterns and tutorials.
📌 Don’t forget to pin this pattern for later!
Happy crocheting! 🧶
— Melissa