
Spooky Mini Halloween Crochet Treat Bag Patterns
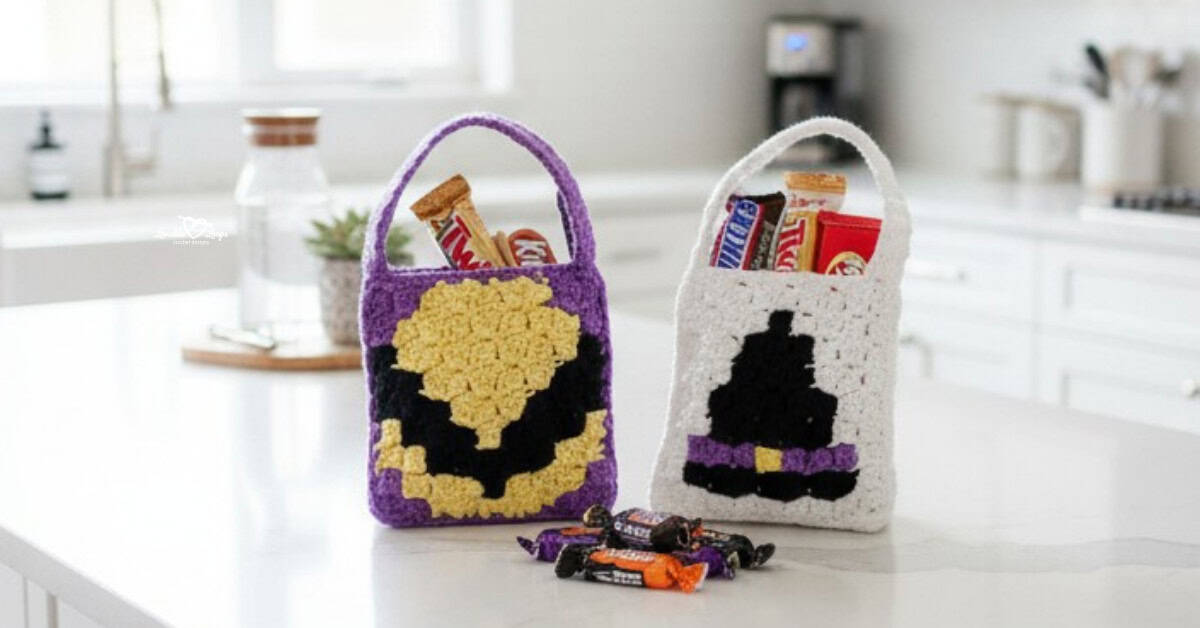
Hey there, Halloween fans! I’m super excited to share my Mini Halloween Crochet Treat Bag Patterns with you! This pattern includes instructions for two different spooky bags: a Frankenstein and witch hat themed bag, and a candy corn and bat themed bag. These mini bags are made by crocheting mini C2C squares.
You just make the squares, sew them together, and add the strap. They’re perfect for stuffing with Halloween treats like candy bars, gummies, or little toys. Let’s get started and make some fun, spooky treat bags for Halloween! The free crochet patterns are below.

Free Halloween Crochet Treat Bag Patterns
These bags make wonderful gifts for teachers, friends, and loved ones. They’re a fun and festive way to show you care and add a spooky touch to your Halloween celebrations. Fill them with delicious treats and small surprises to make someone’s Halloween extra special!
Crochet Project Materials Needed
- Crochet Hook Size: G-6 4 mm
- Yarn: Worsted weight yarn #4. I used Lion Brand Yarns 24/7 Cotton.
Frankenstein: white, green, black, & gray
Witch Hat: black, white, purple, & yellow
Candy Corn: white, purple, orange, & yellow
Bat: purple, black, & yellow - Yarn needle: Use this to weave in your ends.
- Scissors: Use scissors to fasten off your yarn.
- Stitch marker(s): Optional. Use these to help keep track of your stitches.
PDF Version
View this pattern in my Etsy shop: Halloween Crochet Treat Bag Patterns
Halloween Crochet Treat Bag Patterns Information
Skill Level
Advanced beginners. The crochet squares are made using the corner to corner C2C crochet method. It involves color changes.
Finished Measurements
Each mini treat bag measures 5 inches by 5 inches, not including the strap.
The straps are 8 inches long and the strap “drop” is 3 inches.
Gauge
C2C Squares: 8 squares (ch 3 + 3 dc) = 4 inches
Strap: 6 stitches = 1.25 inches and just under 5 rows = 1 inch
Crochet Terms
- dc = double crochet stitch
- sc = single crochet stitch
- ch/chs = chain/chains
- st/sts = stitch/stitches
- sl st = slip stitch
C2C Crochet Technique
- The Halloween squares are made using the c2c technique of making “squares” in diagonal rows starting in the bottom right corner and ending in the top left corner.
- Each square is made of a chain 3 + 3 double crochet.
- Chain 6 to start a new row and chain 3 to start a new square.
- You can follow the picture graphs or the written instructions.
- The written pattern tells you how many squares to make of each color and in what order.
C2C Video Tutorial
Need C2C help? I have a step by step C2C tutorial for my mini heart square on my YouTube channel.
Pattern Notes
- The pattern is written in US terms.
- Make 2 C2C squares for each bag.
- You will make the squares and then sew them together.
- The strap is added last.
Halloween Crochet Treat Bag Patterns
Crochet the squares following the picture graphs or the written instructions.
Frankenstein Square Pattern
Crochet the Frankenstein square following the picture graph or the written pattern.
↙ Row 1: white x 1 (1 square)
↗ Row 2: white x 2 (2 squares)
↙ Row 3: white x 3 (3 squares)
↗ Row 4: white x 4 (4 squares)
↙ Row 5: white x 2, green x 2, white x 1 (5 squares)
↗ Row 6: white x 1, green x 3, gray, white x 1 (6 squares)
↙ Row 7: white x 2, green x 4, white x 1 (7 squares)
↗ Row 8: white x 2, green x 2, black, green, white x 2 (8 squares)
↙ Row 9: white x 2, black, green x 4, white x 2 (9 squares)
Corner: Start decreasing on both ends
↗ Row 10: white x 2, green, black, green x 2, black, white x 1 (8 squares)
↙ Row 11: white x 1, black, green x 3, white x 2 (7 squares)
↗ Row 12: white x 1, gray, green x 2, black, white x 1 (6 squares)
↙ Row 13: white x 1, black x 2, white x 2 (5 squares)
↗ Row 14: white x 2, black, white x 1 (4 squares)
↙ Row 15: white x 3 (3 squares)
↗ Row 16: white x 2 (2 squares)
↙ Row 17: white x 1 (1 square)
Stitch the smile onto the face with a scrap of black yarn.
Border: Make 2 sc in each square along the sides and in each corner square make (2 sc, ch 2, 2 sc).
Witch Hat Square Pattern
Crochet the witch hat square following the picture graph or the written pattern.
↙ Row 1: white x 1 (1 square)
↗ Row 2: white x 2 (2 squares)
↙ Row 3: white x 1, black x 1, white x 1 (3 squares)
↗ Row 4: white x 1, black x 1, purple x 1, white x 1 (4 squares)
↙ Row 5: white x 2, purple x 1, black x 1, white x 1 (5 squares)
↗ Row 6: white x 1, black x 1, purple x 1, black x 1, white x 2 (6 squares)
↙ Row 7: white x 2, black x 2, yellow x 1, black x 1, white x 1 (7 squares)
↗ Row 8: white x 1, black x 1, purple x 1, black x 2, white x 3 (8 squares)
↙ Row 9: white x 3, black x 3, purple x 1, black x 1, white x 1 (9 squares)
Corner: Start decreasing on both ends
↗ Row 10: white x 1, purple x 1, black x 4, white x 2 (8 squares)
↙ Row 11: white x 2, black x 3, white x 2 (7 squares)
↗ Row 12: white x 3, black x 2, white x 1 (6 squares)
↙ Row 13: white x 5 (5 squares)
↗ Row 14: white x 4 (4 squares)
↙ Row 15: white x 3 (3 squares)
↗ Row 16: white x 2 (2 squares)
↙ Row 17: white x 1 (1 square)
Border: Make 2 sc in each square along the sides and in each corner square make (2 sc, ch 2, 2 sc).
Candy Corn Square Pattern
Crochet the candy corn square following the picture graph or the written pattern.
↙ Row 1: purple x 1 (1 square)
↗ Row 2: purple x 2 (2 squares)
↙ Row 3: purple x 3 (3 squares)
↗ Row 4: purple x 1, yellow x 2, purple x 1 (4 squares)
↙ Row 5: purple x 1, yellow x 3, purple x 1 (5 squares)
↗ Row 6: purple x 1, yellow x 3, purple x 2 (6 squares)
↙ Row 7: purple x 2, orange x 1, yellow x 3, purple x 1 (7 squares)
↗ Row 8: purple x 1, yellow x 3, orange x 2, purple x 2 (8 squares)
↙ Row 9: purple x 3, orange x 2, yellow x 2, purple x 2 (9 squares)
Corner: Start decreasing on both ends
↗ Row 10: purple x 1, yellow x 2, orange x 2, white x 1, purple x 2 (8 squares)
↙ Row 11: purple x 2, white x 1, orange x 2, yellow x 1, purple x 1 (7 squares)
↗ Row 12: purple x 2, orange x 1, white x 2, purple x 1 (6 squares)
↙ Row 13: purple x 5 (5 squares)
↗ Row 14: purple x 4 (4 squares)
↙ Row 15: purple x 3 (3 squares)
↗ Row 16: purple x 2 (2 squares)
↙ Row 17: purple x 1 (1 square)
Border: Make 2 sc in each square along the sides and in each corner square make (2 sc, ch 2, 2 sc).
Bat Square Pattern
Crochet the Halloween bat square following the picture graph or the written pattern.
↙ Row 1: purple x 1 (1 square)
↗ Row 2: purple x 2 (2 squares)
↙ Row 3: yellow x 3 (3 squares)
↗ Row 4: yellow x 4 (4 squares)
↙ Row 5: black x 3, yellow x 2 (5 squares)
↗ Row 6: yellow x 1, black x 5 (6 squares)
↙ Row 7: black x 5, yellow x 2 (7 squares)
↗ Row 8: purple x 1, yellow x 1, black x 1, yellow x 4, purple x 1 (8 squares)
↙ Row 9: purple x 1, yellow x 4, black x 2, yellow x 1, purple x 1 (9 squares)
Corner: Start decreasing on both ends
↗ Row 10: purple x 1, yellow x 1, black x 1, yellow x 4, purple x 1 (8 squares)
↙ Row 11: yellow x 4, black x 2, yellow x 1 (7 squares)
↗ Row 12: yellow x 1, black x 1, yellow x 4 (6 squares)
↙ Row 13: yellow x 3, black x 2 (5 squares)
↗ Row 14: black x 1, yellow x 3 (4 squares)
↙ Row 15: yellow x 2, black x 1 (3 squares)
↗ Row 16: purple x 2 (2 squares)
↙ Row 17: purple x 1 (1 square)
Border: Make 2 sc in each square along the sides and in each corner square make (2 sc, ch 2, 2 sc).
Assembling the Halloween Crochet Treat Bag Patterns
Place 2 squares back to back with the “right sides” facing out. Sew three sides together, leaving the top open.
Adding the Straps to the Halloween Crochet Treat Bag Patterns
Start the strap by working into the 6 center stitches on one side of the bag. Crochet the strap in rows, then attach it to the 6 center stitches on the opposite side.
Row 1: Ch 1, sc in 6 stitches, turn (6 stitches)
Rows 2-38: Ch 1, sc in each st, turn (6 stitches)
Fasten off and sew to the 6 center stitches on the opposite side.
Finishing the Halloween Crochet Treat Bag Patterns
Fasten off and then weave in your ends.

More free crochet accessories patterns
Looking for more practical crochet accessories to make? Browse my favorite crochet bottle holder, koozie, and gift bag patterns, including drink cozies, bottle holders, gift bags, and other useful handmade projects for gifting and everyday use.
You can also visit my full collection of crochet accessory patterns for even more small projects to wear, use, and gift.
Let’s connect!
I’d love to see what you’re making! Share your finished project and follow along for more free crochet patterns and tutorials.
📌 Don’t forget to pin this pattern for later!
Happy crocheting! 🧶
— Melissa