
Cute Crochet Witch Hat Pattern for Beginners
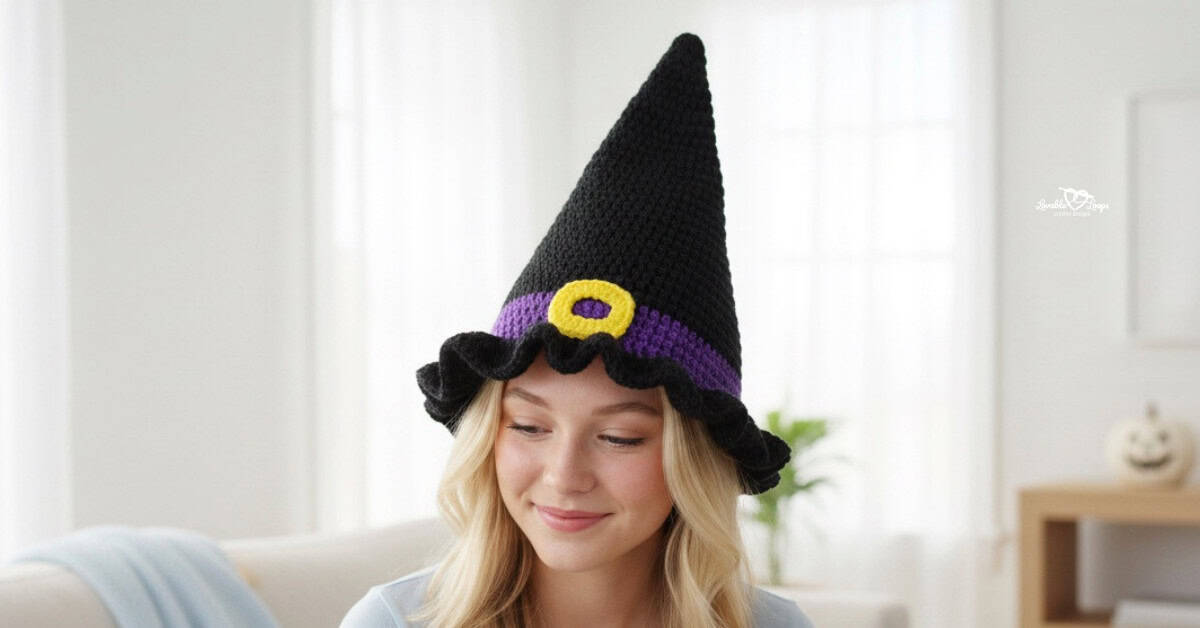
I’m super excited to share my Crochet Witch Hat Pattern with you! This cute hat is perfect for the spooky season and is designed for both children and adults. It’s a beginner-friendly pattern, so anyone can join in on the fun.
Imagine wearing this adorable witch hat for Halloween or any spooky event. Grab your yarn and hook, and let’s make this magical hat together! The free crochet pattern is below.

Free Crochet Witch Hat Pattern
Crochet Project Materials Needed
- Crochet hook size: H-8 5 mm or size needed for gauge
- Yarn: Worsted weight yarn #4 in black, purple, and yellow.
- Yarn needle: Use this to weave in your ends.
- Scissors: Use scissors to fasten off your yarn.
- Stitch marker(s): These help keep track of your stitches.
PDF Version
View this pattern in my Etsy shop: crochet witch hat pattern
Crochet Witch Hat Pattern Information
Skill Level
Beginner. This free crochet hat pattern uses basic crochet stitches in a basic stitch pattern.
Finished Sizes
Child and Adult
Crochet Gauge
15 stitches and 9 rounds = 4 inches
Crochet Terms
- dc = double crochet stitch
- hdc = half double crochet
- ch/chs = chain/chains
- st/sts = stitch/stitches
- sl st = slip stitch
- rnd/rnds = round/rounds
Pattern Notes
- Rounds 1-35 are the same for both sizes.
- The hat is worked in the round from the top down.
- Join each round with a slip stitch to the first stitch made in that round.
- Repeat instructions between the asterisks (*) for the rest of the round.
- The chain at the beginning of each round does not count as your first stitch.
- The pattern is written in US terms.
Crochet Witch Hat Pattern Information
Rnd 1: Magic circle, ch 2, 6 dc, join with sl st to the top of the first dc. (6 stitches)
Rnd 2: Ch 2, 2 dc in each st, join. (12 stitches)
Rnds 3 & 4: Ch 2, dc in each st, join. (12 stitches)
Rnd 5: Ch 2, *2 dc, dc in next st*, join. (18 stitches)
Rnds 6 & 7: Ch 2, dc in each st, join. (18 stitches)
Rnd 8: Ch 2, *2 dc, dc in next 2 sts*, join. (24 stitches)
Rnds 9 & 10: Ch 2, dc in each st, join. (24 stitches)
Rnd 11: Ch 2, *2 dc, dc in next 3 sts*, join. (30 stitches)
Rnds 12 & 13: Ch 2, dc in each st, join. (30 stitches)
Rnd 14: Ch 2, *2 dc, dc in next 4 sts*, join. (36 stitches)
Rnds 15 & 16: Ch 2, dc in each st, join. (36 stitches)
Rnd 17: Ch 2, *2 dc, dc in next 5 sts*, join. (42 stitches)
Rnds 18 & 19: Ch 2, dc in each st, join. (42 stitches)
Rnd 20: Ch 2, *2 dc, dc in next 6 sts*, join. (48 stitches)
Rnds 21 & 22: Ch 2, dc in each st, join. (48 stitches)
Rnd 23: Ch 2, *2 dc, dc in next 7 sts*, join. (54 stitches)
Rnds 24 & 25: Ch 2, dc in each st, join. (54 stitches)
Rnd 26: Ch 2, *2 dc, dc in next 8 sts*, join. (60 stitches)
Rnds 27 & 28: Ch 2, dc in each st, join. (60 stitches)
Rnd 29: Ch 2, *2 dc, dc in next 9 sts*, join. (66 stitches)
Rnds 30 & 31: Ch 2, dc in each st, join. (66 stitches)
Rnd 32: Ch 2, *2 dc, dc in next 10 sts*, join. (72 stitches)
Rnds 33 & 34: Ch 2, dc in each st, join. (72 stitches)
Rnd 35: Ch 2, *2 dc, dc in next 11 sts*, join. (78 stitches)
Child Size Crochet Witch Hat Pattern
Rnd 36: Ch 2, dc in each st, join. (78 stitches)
Join purple yarn.
Rnds 37-39: Ch 2, dc in each st, join. (78 stitches)
You will now make the hat brim.
Join black yarn.
Rnd 40: Ch 2, *2 dc, dc in next st*, join. (117 stitches)
Rnd 41: Ch 2, *2 dc, dc in next 2 sts*, join. (156 stitches)
Rnd 42: Ch 2, *2 dc, dc in next 3 sts*, join. (195 stitches)
Adult Size Crochet Witch Hat Pattern
Rnds 36 & 37: Ch 2, dc in each st, join. (78 stitches)
Rnd 38: Ch 2, *2 dc, dc in next 12 sts*, join. (84 stitches)
Join purple yarn.
Rnds 39-41: Ch 2, dc in each st, join. (84 stitches)
You will now make the hat brim.
Join black yarn.
Rnd 42: Ch 2, *2 dc, dc in next st*, join. (126 stitches)
Rnd 43: Ch 2, *2 dc, dc in next 2 sts*, join. (168 stitches)
Rnd 44: Ch 2, *2 dc, dc in next 3 sts*, join. (210 stitches)
Buckle Pattern
Use yellow yarn.
The bolded ch 2 spaces will create the corners of the buckle.
Rnd 1: Chain 20 and join in the round.
Rnd 2: Ch 2, hdc in 6 chs, ch 2, hdc in 4 chs, ch 2, hdc in 6 chs, ch 2, hdc in 4 chs, ch 2 and join with a slip stitch to the top of the first hdc.
Use a tapestry needle to sew the buckle to the front of your hat.
Finishing your Crochet Witch Hat Pattern
Fasten off and then weave in the ends.

Looking for more Free Crochet Patterns?
You may also like these crochet hat patterns: basic beanie, bucket hat, turkey hat, spooky elf hat, and my candy corn hat pattern.
Let’s Connect!
I’d love to hear from you. You can find me on social media- Instagram, Facebook, Pinterest, and my YouTube channel. Until then, happy crocheting!