
Queen Elsa yarn wig crochet pattern
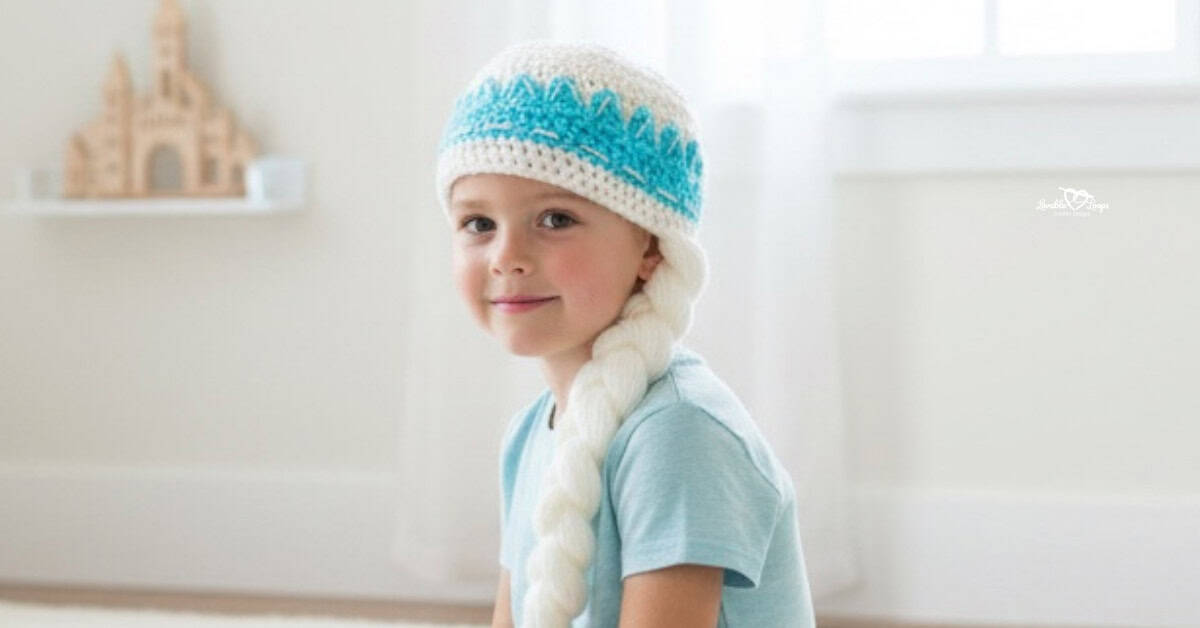
I’m super excited to share my Princess Elsa Wig Crochet Pattern with you! This easy beginner pattern is perfect for everyone, from baby to adult. It features a beautiful crown and a large side braid, making it the ultimate accessory for Halloween costumes or playing dress-up.
Imagine how magical kids will feel wearing this stunning Princess Elsa wig. Grab your yarn and hook, and let’s create this enchanting Princess Elsa wig together! The free crochet pattern is below.

Free Elsa Wig Crochet Pattern
Crochet Project Materials Needed
- Crochet hook size: I-9 5.5 mm
- Yarn: Worsted weight yarn #4 in blue, white, and gray.
- Yarn needle: Use this to weave in your ends.
- Scissors: Use scissors to fasten off your yarn.
- Stitch marker(s): Optional. Use these to help keep track of your stitches
Elsa Wig Crochet Pattern Information
Skill Level
Advanced beginner
Size Chart
| Hat Size | Crown | Head Circumference | Height |
| 0-3 Months | 4.5 inches | 13-14 inches | 5 inches |
| 3-6 Months | 5 inches | 14-15 inches | 5.5 inches |
| 6-12 Months | 5.5 inches | 16-17 inches | 6.25 inches |
| Toddler | 6 inches | 18-19 inches | 6.75 inches |
| Child | 6.5 inches | 19-20 inches | 7 inches |
| Adult | 7 inches | 20-23 inches | 7.75 inches |
Gauge
15 stitches and 10 rounds = 4 inches
Crochet Terms
- dc = double crochet
- sc = single crochet
- hdc = half double crochet
- tc = treble crochet
- ch/chs = chain/chains
- st/sts = stitch/stitches
- sl st = slip stitch
- rnd/rnds = round/rounds
- rem = remaining
Pattern Notes
- The chain at the beginning of each round does not count as your first stitch.
- Join each round with a slip stitch to the first stitch made in that round.
- Repeat instructions between the asterisks (*) for the rest of the round.
- You are crocheting in the round from the top of the hat down.
- The pattern is written in US crochet terms.
Magic Circle Alternative
If you’re not comfortable with using a magic circle, you can use an alternative method to make round 1 of the pattern. This method is just as effective and might be easier for beginners.
Round 1: Chain 4, make 11 dc in the 4th ch from the hook, join (11 stitches)
Elsa Wig Crochet Pattern Instructions
0-3 Month Baby Elsa Wig Crochet Pattern
Rnd 1: Magic circle, ch 2, 11 dc, join (11 stitches)
Rnd 2: Ch 2, 2 dc in each st, join (22 stitches)
Rnd 3: Ch 2, *2 dc, dc in next st*, join (33 stitches)
Rnd 4: Ch 2, *2 dc, dc in next 2 sts*, join (44 stitches)
Rnd 5: Ch 2, *2 dc, dc in next 10 sts*, join (48 stitches)
Rnd 6: Ch 2, dc in each st, join (48 stitches)
Rnds 7– 13: Repeat round 6 (48 stitches)
3-6 Month Baby Elsa Wig Crochet Pattern
Rnd 1: Magic circle, ch 2, 11 dc, join (11 stitches)
Rnd 2: Ch 2, 2 dc in each st, join (22 stitches)
Rnd 3: Ch 2, *2 dc, dc in next st*, join (33 stitches)
Rnd 4: Ch 2, *2 dc, dc in next 2 sts*, join (44 stitches)
Rnd 5: Ch 2, *2 dc, dc in next 10 sts*, join (48 stitches)
Rnd 6: Ch 2, *2 dc, dc in next 11 sts*, join (52 stitches)
Rnd 7: Ch 2, dc in each st, join (52 stitches)
Rnds 8– 15: Repeat round 7 (52 stitches)
6-12 Month Baby Elsa Wig Crochet Pattern
Rnd 1: Magic circle, ch 2, 11 dc, join (11 stitches)
Rnd 2: Ch 2, 2 dc in each st, join (22 stitches)
Rnd 3: Ch 2, *2 dc, dc in next st*, join (33 stitches)
Rnd 4: Ch 2, *2 dc, dc in next 2 sts*, join (44 stitches)
Rnd 5: Ch 2, *2 dc, dc in next 10 sts*, join (48 stitches)
Rnd 6: Ch 2, *2 dc, dc in next 11 sts*, join (52 stitches)
Rnd 7: Ch 2, *2 dc, dc in next 12 sts*, join (56 stitches)
Rnd 8: Ch 2, dc in each st, join (56 stitches)
Rnds 9– 16: Repeat round 8 (56 stitches)
Toddler Size Elsa Wig Crochet Pattern
Rnd 1: Magic circle, ch 2, 11 dc, join (11 stitches)
Rnd 2: Ch 2, 2 dc in each st, join (22 stitches)
Rnd 3: Ch 2, *2 dc, dc in next st*, join (33 stitches)
Rnd 4: Ch 2, *2 dc, dc in next 2 sts*, join (44 stitches)
Rnd 5: Ch 2, *2 dc, dc in next 10 sts*, join (48 stitches)
Rnd 6: Ch 2, *2 dc, dc in next 11 sts*, join (52 stitches)
Rnd 7: Ch 2, *2 dc, dc in next 12 sts*, join (56 stitches)
Rnd 8: Ch 2, *2 dc, dc in next 13 sts*, join (60 stitches)
Rnd 9: Ch 2, dc in each st, join (60 stitches)
Rnds 10– 18: Repeat round 9 (60 stitches)
Child Size Elsa Wig Crochet Pattern
Rnd 1: Magic circle, ch 2, 11 dc, join (11 stitches)
Rnd 9: Ch 2, *2 dc, dc in next 14 sts*, join (64 stitches)
Rnd 2: Ch 2, 2 dc in each st, join (22 stitches)
Rnd 3: Ch 2, *2 dc, dc in next st*, join (33 stitches)
Rnd 4: Ch 2, *2 dc, dc in next 2 sts*, join (44 stitches)
Rnd 5: Ch 2, *2 dc, dc in next 10 sts*, join (48 stitches)
Rnd 6: Ch 2, *2 dc, dc in next 11 sts*, join (52 stitches)
Rnd 7: Ch 2, *2 dc, dc in next 12 sts*, join (56 stitches)
Rnd 8: Ch 2, *2 dc, dc in next 13 sts*, join (60 stitches)
Rnd 10: Ch 2, dc in each st, join (64 stitches)
Rnds 11– 19: Repeat round 10 (64 stitches)
Adult Size Elsa Wig Crochet Pattern
Rnd 1: Magic circle, ch 2, 11 dc, join (11 stitches)
Rnd 2: Ch 2, 2 dc in each st, join (22 stitches)
Rnd 3: Ch 2, *2 dc, dc in next st*, join (33 stitches)
Rnd 4: Ch 2, *2 dc, dc in next 2 sts*, join (44 stitches)
Rnd 5: Ch 2, *2 dc, dc in next 10 sts*, join (48 stitches)
Rnd 6: Ch 2, *2 dc, dc in next 11 sts*, join (52 stitches)
Rnd 7: Ch 2, *2 dc, dc in next 12 sts*, join (56 stitches)
Rnd 8: Ch 2, *2 dc, dc in next 13 sts*, join (60 stitches)
Rnd 9: Ch 2, *2 dc, dc in next 14 sts*, join (64 stitches)
Rnd 10: Ch 2, *2 dc, dc in next 15 sts*, join (68 stitches)
Rnd 11: Ch 2, dc in each st, join (68 stitches)
Rnds 12– 21: Repeat round 11 (68 stitches)
Crown for the Elsa Wig Crochet Pattern
For size 0-3 months, work the first row of the crown between the stitches in the second to last row. For larger sizes, start the crown a few rows higher. The crown will be on the front half of your wig. Ensure your stitches are divisible by three.
Use blue yarn.
Row 1: ch 1, sc across the front half of your wig, turn. For my 0-3 months size I made 27 sc.
Row 2: ch 2, dc in each st, turn
Row 3: ch 1, *sc in next st, chain 5 and (sc in 2nd ch from hook, hdc, dc, tc), skip a stitch and slip stitch in next st*, repeat across.
Fasten off leaving a long tail and sew the crown points to the wig.
Outline the crown in gray yarn.
Braid for the Elsa Wig Crochet Pattern
Cut 60 strips of yarn, each 40″ long for a 0-3 month size wig. Attach 6 strands to each of the 10 stitches on the right side of the wig, pulling each strand halfway through. Divide into three sections and braid. Fasten the braid with a light teal yarn bow and trim the ends evenly.
Finishing the Elsa Wig Crochet Pattern
Weave in the ends.

Looking for More Free Crochet Patterns?
You may also like my basic beanie, basic bucket hat, turkey hat, and pumpkin patch hat patterns.
Let’s Connect!
I’d love to hear from you. You can find me on social media: Instagram, Facebook, Pinterest, and my YouTube channel. Until then, happy crocheting!