
Crochet moose hat pattern
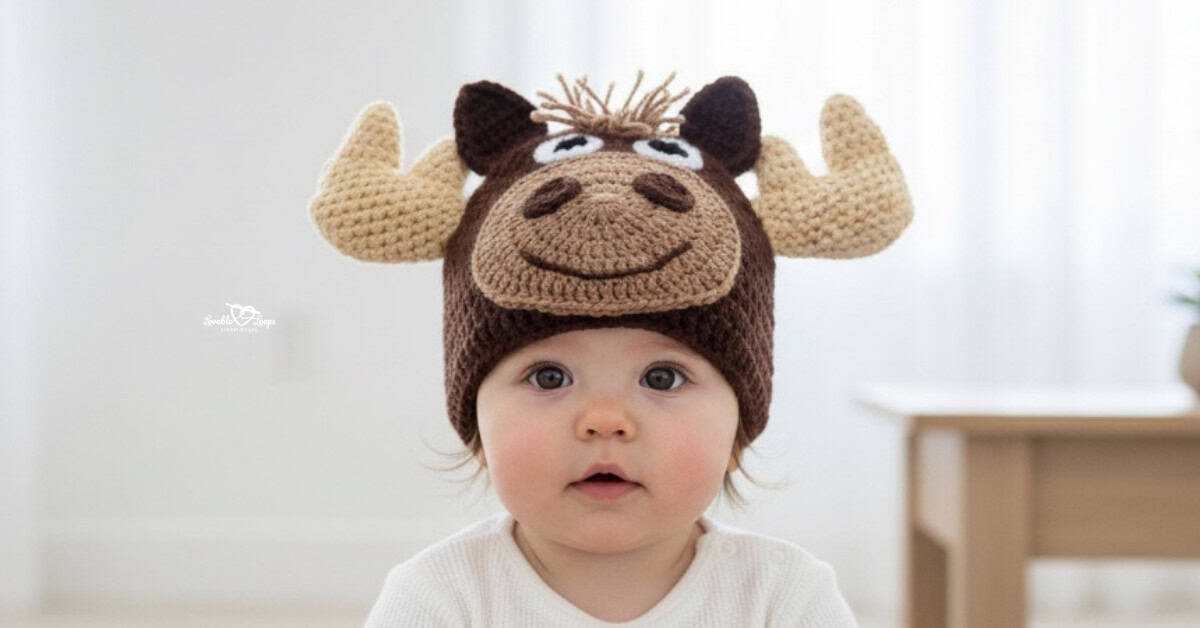
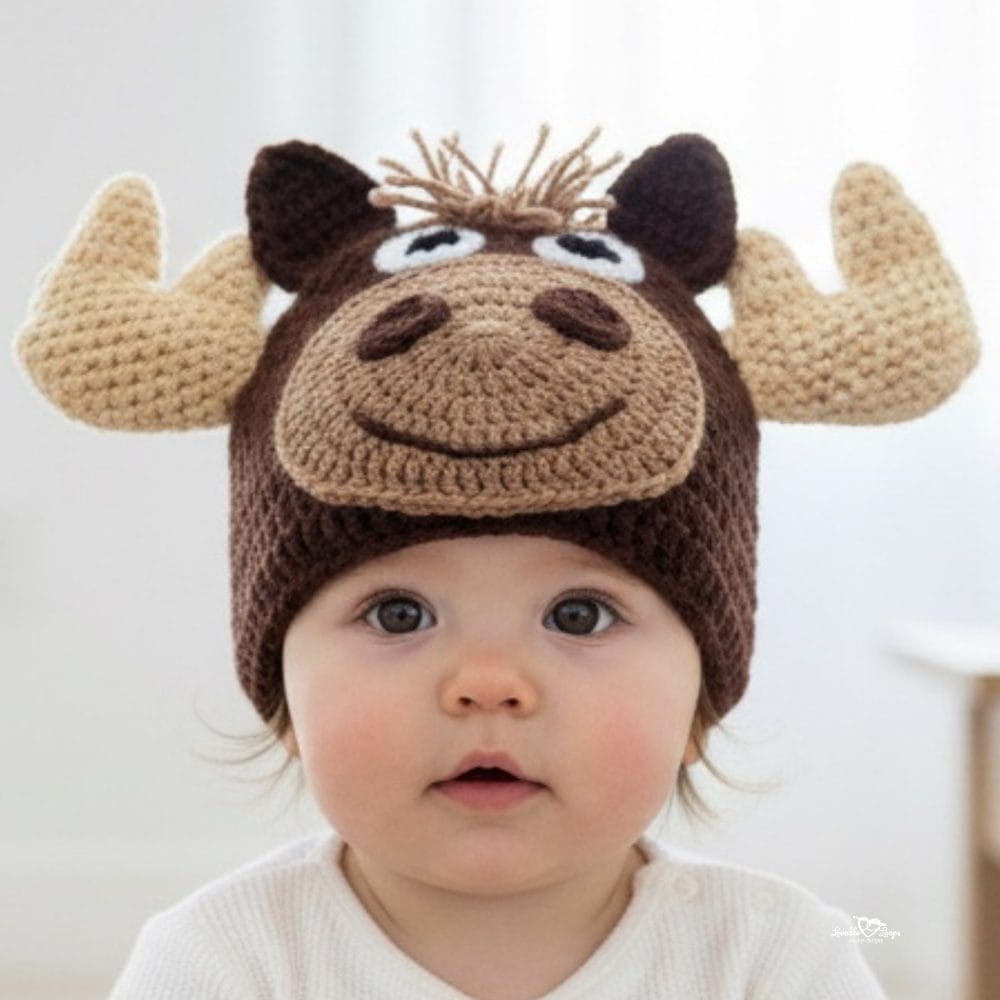
Get ready to add some woodland charm to your wardrobe with my Crochet Moose Hat Pattern! This cozy and fun hat features adorable antlers that capture the essence of the great outdoors. Perfect for nature lovers and anyone who enjoys unique, animal-inspired accessories, this hat is both practical and playful.
The pattern is easy to follow, making it a great project for crocheters of all levels. Let’s crochet this moose hat together and bring a bit of the forest to your winter gear! The free crochet pattern is below.
Looking for more cute designs? Explore my full collection of crochet animal hat patterns.

Free Crochet Moose Hat Pattern
Moose are majestic creatures known for their impressive antlers and strong presence in the wild. As symbols of the wilderness, they embody the beauty and strength of nature. People love moose for their unique look and the sense of adventure they inspire.
This Crochet Moose Hat Pattern captures that spirit, making it a hit with outdoor enthusiasts and animal lovers alike. Whether you’re crafting for someone who loves the great outdoors or just want to bring a bit of wilderness into your life, this moose hat is sure to be a favorite!
Crochet Project Materials Needed
- Crochet hook sizes:
I-9 5.5 mm (hat) or size needed for gauge
H-8 5 mm (hat parts) - Yarn: Worsted weight yarn #4 in brown, light brown, black, white, and tan.
- Fiber fill: Use this to stuff the antlers.
- Yarn needle: Use this to weave in your ends.
- Scissors: Use scissors to fasten off your yarn.
- Stitch marker(s): Optional. Use these to help keep track of your stitches.
Crochet Moose Hat Pattern Information
Looking for a handmade gift that’s both cozy and unique? The Crochet Moose Hat is a perfect choice! Its charming design, complete with antlers, makes it a standout piece that’s sure to be loved by anyone who receives it.
Whether you’re making it for a birthday, a holiday, or just because, this moose hat is a thoughtful and fun gift that shows you care. It’s also a fantastic option for selling at craft fairs, where its woodland-inspired design is sure to attract customers looking for something special and handmade.
Skill Level
Advanced beginner
Size Chart
| Hat Size | Crown | Circumference | Height |
| 0-3 Months | 4.5 inches | 13-14 inches | 5 inches |
| 3-6 Months | 5 inches | 14-15 inches | 5.5 inches |
| 6-12 Months | 5.5 inches | 16-17 inches | 6.25 inches |
| Toddler | 6 inches | 18-19 inches | 6.75 inches |
| Child | 6.5 inches | 19-20 inches | 7 inches |
| Adult | 7 inches | 20-23 inches | 7.75 inches |
Gauge
15 stitches and 10 rounds = 4 inches
Crochet Terms
- dc = double crochet
- sc = single crochet
- sc2tog = single crochet decrease
- ch/chs = chain/chains
- st/sts = stitch/stitches
- sl st = slip stitch
- rnd/rnds = round/rounds
- rem = remaining
Crochet Pattern Notes
- The chain at the beginning of each round does not count as your first stitch.
- Join each round with a slip stitch to the first stitch made in that round.
- Repeat instructions between the asterisks (*) for the rest of the round.
- You are crocheting in the round from the top of the hat down.
- The pattern is written in US terms.
Magic Circle Alternative
If you find the magic circle tricky, try this easier method for round 1: Chain 4, make 11 dc in the 4th ch from the hook, join (11 stitches)
Crochet Moose Hat Pattern Instructions
0-3 Month Baby Crochet Moose Hat Pattern
Rnd 1: Magic circle, ch 2, 11 dc, join (11 stitches)
Rnd 2: Ch 2, 2 dc in each st, join (22 stitches)
Rnd 3: Ch 2, *2 dc, dc in next st*, join (33 stitches)
Rnd 4: Ch 2, *2 dc, dc in next 2 sts*, join (44 stitches)
Rnd 5: Ch 2, *2 dc, dc in next 10 sts*, join (48 stitches)
Rnds 6-13: Ch 2, dc in each st, join (48 stitches)
Rnd 14: Ch 1, sc in each st, join and fasten off (48 stitches)
3-6 Month Baby Crochet Moose Hat Pattern
Rnd 1: Magic circle, ch 2, 11 dc, join (11 stitches)
Rnd 2: Ch 2, 2 dc in each st, join (22 stitches)
Rnd 3: Ch 2, *2 dc, dc in next st*, join (33 stitches)
Rnd 4: Ch 2, *2 dc, dc in next 2 sts*, join (44 stitches)
Rnd 5: Ch 2, *2 dc, dc in next 10 sts*, join (48 stitches)
Rnd 6: Ch 2, *2 dc, dc in next 11 sts*, join (52 stitches)
Rnds 7-15: Ch 2, dc in each st, join (52 stitches)
Rnd 16: Ch 1, sc in each st, join and fasten off (52 stitches)
6-12 Month Baby Crochet Moose Hat Pattern
Rnd 1: Magic circle, ch 2, 11 dc, join (11 stitches)
Rnd 2: Ch 2, 2 dc in each st, join (22 stitches)
Rnd 3: Ch 2, *2 dc, dc in next st*, join (33 stitches)
Rnd 4: Ch 2, *2 dc, dc in next 2 sts*, join (44 stitches)
Rnd 5: Ch 2, *2 dc, dc in next 10 sts*, join (48 stitches)
Rnd 6: Ch 2, *2 dc, dc in next 11 sts*, join (52 stitches)
Rnd 7: Ch 2, *2 dc, dc in next 12 sts*, join (56 stitches)
Rnds 8-16: Ch 2, dc in each st, join (56 stitches)
Rnd 17: Ch 1, sc in each st, join and fasten off (56 stitches)
Toddler Crochet Moose Hat Pattern
Rnd 1: Magic circle, ch 2, 11 dc, join (11 stitches)
Rnd 2: Ch 2, 2 dc in each st, join (22 stitches)
Rnd 3: Ch 2, *2 dc, dc in next st*, join (33 stitches)
Rnd 4: Ch 2, *2 dc, dc in next 2 sts*, join (44 stitches)
Rnd 5: Ch 2, *2 dc, dc in next 10 sts*, join (48 stitches)
Rnd 6: Ch 2, *2 dc, dc in next 11 sts*, join (52 stitches)
Rnd 7: Ch 2, *2 dc, dc in next 12 sts*, join (56 stitches)
Rnd 8: Ch 2, *2 dc, dc in next 13 sts*, join (60 stitches)
Rnds 9-18: Ch 2, dc in each st, join (60 stitches)
Rnd 19: Ch 1, sc in each st, join and fasten off (60 stitches)
Child Crochet Moose Hat Pattern
Rnd 1: Magic circle, ch 2, 11 dc, join (11 stitches)
Rnd 2: Ch 2, 2 dc in each st, join (22 stitches)
Rnd 3: Ch 2, *2 dc, dc in next st*, join (33 stitches)
Rnd 4: Ch 2, *2 dc, dc in next 2 sts*, join (44 stitches)
Rnd 5: Ch 2, *2 dc, dc in next 10 sts*, join (48 stitches)
Rnd 6: Ch 2, *2 dc, dc in next 11 sts*, join (52 stitches)
Rnd 7: Ch 2, *2 dc, dc in next 12 sts*, join (56 stitches)
Rnd 8: Ch 2, *2 dc, dc in next 13 sts*, join (60 stitches)
Rnd 9: Ch 2, *2 dc, dc in next 14 sts*, join (64 stitches)
Rnds 11-19: Ch 2, dc in each st, join (64 stitches)
Rnd 20: Ch 1, sc in each st, join and fasten off (64 stitches)
Adult Crochet Moose Hat Pattern
Rnd 1: Magic circle, ch 2, 11 dc, join (11 stitches)
Rnd 2: Ch 2, 2 dc in each st, join (22 stitches)
Rnd 3: Ch 2, *2 dc, dc in next st*, join (33 stitches)
Rnd 4: Ch 2, *2 dc, dc in next 2 sts*, join (44 stitches)
Rnd 5: Ch 2, *2 dc, dc in next 10 sts*, join (48 stitches)
Rnd 6: Ch 2, *2 dc, dc in next 11 sts*, join (52 stitches)
Rnd 7: Ch 2, *2 dc, dc in next 12 sts*, join (56 stitches)
Rnd 8: Ch 2, *2 dc, dc in next 13 sts*, join (60 stitches)
Rnd 9: Ch 2, *2 dc, dc in next 14 sts*, join (64 stitches)
Rnd 10: Ch 2, *2 dc, dc in next 15 sts*, join (68 stitches)
Rnds 11-21: Ch 2, dc in each st, join (68 stitches)
Rnd 22: Ch 1, sc in each st, join and fasten off (68 stitches)
Muzzle for the Crochet Moose Hat Pattern
Rnd 1: Magic circle, ch 2, 11 dc, join (11 stitches)
Rnd 2: Ch 2, 2 dc in each st, join (22 stitches)
Rnd 3: Ch 2, *2 dc, dc in next st*, join (33 stitches)
Rnd 4: Ch 2, *2 dc, dc in next 2 sts*, join (44 stitches)
0-3, 3-6, and 6-12 Months Muzzle Continued
Rnd 5: Ch 2, dc in 12, hdc, sc in 8, hdc, dc in 12, hdc, sc in 8, hdc, join and fasten
Toddler, Child, and Adult Muzzle Continued
Rnd 5: Ch 2, *2 dc, dc in next 3 sts*, join (55 stitches)
Rnd 6: Ch 2, dc in 15, hdc, sc in 10, hdc, dc in 15, hdc, sc in 11, hdc, join
Nostrils for the Crochet Moose Hat Pattern
Rnd 1: Magic circle, 6 sc, join (6 stitches)
Rnd 2: Ch 2, *2 dc, sc in 2 sts*, join and fasten off (8 stitches)
Sew the nostrils to the muzzle, then stitch a smile underneath. Sew the muzzle to the hat.
Eyes for the Crochet Moose Hat Pattern
Rnd 1: Magic circle, 9 hdc, join (9 stitches)
Switch to white yarn.
Rnd 2: Ch 2, hdc in 4, and then sc around the entire eye (including the 4 hdc), join to first sc and fasten off
Sew the eyes to the hat.
Ears for the Crochet Moose Hat Pattern
Row 1: Ch 7, sc in 2nd ch from hook and each rem ch, turn (6 stitches)
Row 2: Ch 1, 2 sc, sc in 4, 2 sc, turn (8 stitches)
Row 3: Ch 1, sc in each st, turn (8 stitches)
Row 4: Ch 1, sc in each st, turn (8 stitches)
Row 5: Ch 1, sc2tog, sc in 4, sc2tog, turn (6 stitches)
Row 6: Ch 1, sc in each st, turn (6 stitches)
Row 7: Ch 1, sc2tog, sc in 2, sc2tog, turn (4 stitches)
Row 8: Ch 1, sc in each st, turn (4 stitches)
Row 9: Ch 1, sc2tog, sc2tog, turn (2 stitches)
Row 10: Ch 1, sc in each st, turn (2 stitches)
Row 11: Ch 1, sc2tog and continue to sc around entire ear, join and fasten off
Sew the ears to the hat.
Antlers for the Crochet Moose Hat Pattern
Main Piece (make 2)
Chain 14 and join in the round.
Rnd 1: Ch 2, hdc in each ch, join (14 stitches)
Rnd 2: Ch 2, *2 hdc, hdc in next 6 sts*, join (16 stitches)
Rnd 3: Ch 2, hdc in each st, join (16 stitches)
Rnd 4: Ch 2, *2 hdc, hdc in next 7 sts*, join (18 stitches)
Rnd 5: Ch 2, hdc in each st, join (18 stitches)
Rnd 6: Ch 2, *2 hdc, hdc in next 8 sts*, join (20 stitches)
Rnd 7: Ch 2, hdc in each st, join (20 stitches)
Rnd 8: Ch 2, hdc2tog, hdc2tog, hdc in 16 sts, join (18 stitches)
Rnd 9: Ch 2, hdc2tog, hdc2tog, hdc in 14 sts, join (16 stitches)
Rnd 10: Ch 2, hdc2tog, hdc2tog, hdc in 12 sts, join (14 stitches)
Rnd 11: Ch 2, hdc2tog, hdc2tog, hdc in 10 sts, join and fasten off (12 stitches)
Sew the end where you left off shut. Stuff with fiber fill.
Small and Large Points– make 2 of each
Rnd 1: Magic circle, 4 hdc, join (4 stitches)
Rnd 2: Ch 2, 2 hdc in each st, join (8 stitches)
Rnd 3: Ch 2, hdc in each st, join (8 stitches)
Rnd 4: Ch 2, *2 hdc, hdc in 1 st*, join (12 stitches)
Rnd 5: Ch 2, hdc in each st, join (12 stitches)
Stop here for the small points.
Rnd 6: Ch 2, hdc in each st, join (12 stitches)
Stuff the points with fiber fill.
Sew the larger point to what will be the top of the antler, and sew the smaller point to the base of the antler.
Hair for the Crochet Moose Hat Pattern
Cut small strips of yarn and fold each in half. Using a crochet hook, pull the loop under a stitch between the ears. Pull the yarn ends through the loop, tighten, and tie a knot. Trim the yarn ends to keep the “hair” standing up.
Finishing the Crochet Moose Hat Pattern
Fasten off and then weave in the ends.

Looking for More Free Crochet Patterns?
You may also like my basic beanie, basic bucket hat, turkey hat, and pumpkin patch hat patterns.
Let’s Connect!
I’d love to hear from you. You can find me on social media: Instagram, Facebook, Pinterest, and my YouTube channel. Until then, happy crocheting!