
Rainbow Brite yarn wig crochet pattern
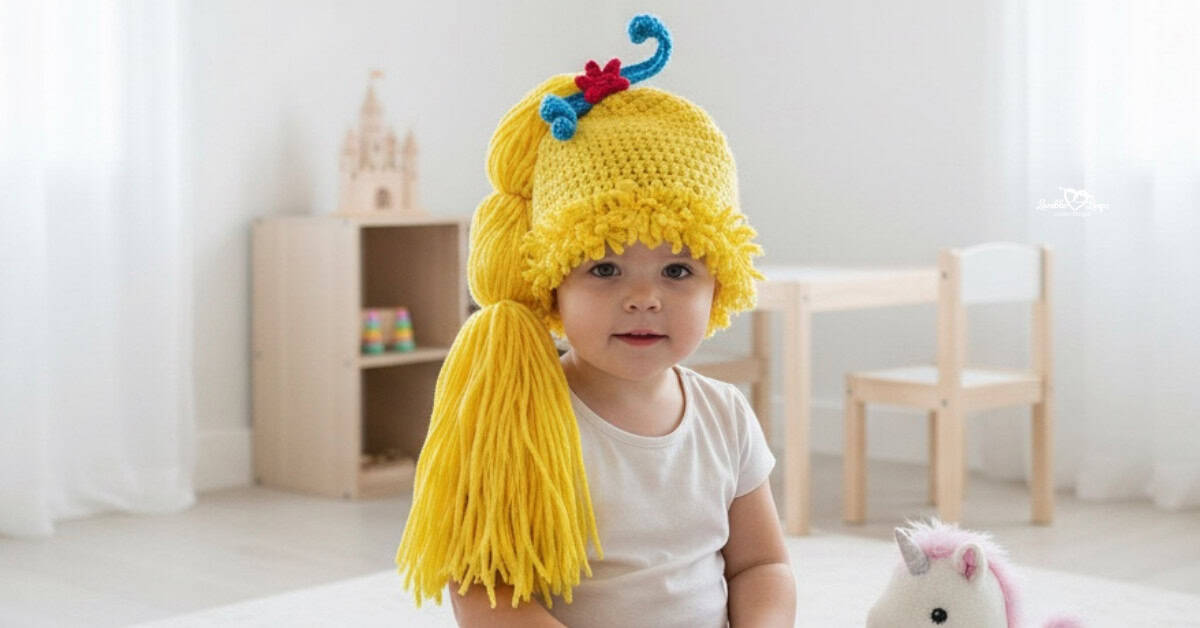
I’m super excited to share my Rainbow Brite Costume Crochet Wig Pattern with you. This wig goes perfectly with my Rainbow Brite costume dress pattern and is designed for all sizes, from baby to adult.
It’s super easy to make—you just crochet my basic beanie, then add the ponytail, bangs, and ribbon. Plus, I’ve included a video tutorial to help you every step of the way. Let’s bring some Rainbow Brite magic to your costume! The free crochet pattern is below.

Free Crochet Wig Pattern
Crochet Project Materials Needed
- Crochet hook sizes:
I-9 5.5 mm (hat) or size needed for gauge
H-8 5 mm (bow) - Yarn: Worsted weight yarn #4 in yellow, blue, and red.
- Yarn needle: Use this to weave in your ends.
- Scissors: Use scissors to fasten off your yarn.
- Stitch marker(s): Optional. Use these to help keep track of your stitches.

Crochet Wig Pattern Information
Skill Level
Beginner
Size Chart
| Hat Size | Crown | Circumference | Height |
| 0-3 Months | 4.5 inches | 13-14 inches | 5 inches |
| 3-6 Months | 5 inches | 14-15 inches | 5.5 inches |
| 6-12 Months | 5.5 inches | 16-17 inches | 6.25 inches |
| Toddler | 6 inches | 18-19 inches | 6.75 inches |
| Child | 6.5 inches | 19-20 inches | 7 inches |
| Adult | 7 inches | 20-23 inches | 7.75 inches |
Gauge
15 stitches and 10 rounds = 4 inches
Crochet Terms
- dc = double crochet
- sc = single crochet
- sc2tog = single crochet decrease
- ch/chs = chain/chains
- st/sts = stitch/stitches
- sl st = slip stitch
- rnd/rnds = round/rounds
- rem = remaining
Crochet Pattern Notes
- The chain at the beginning of each round does not count as your first stitch.
- Join each round with a slip stitch to the first stitch made in that round.
- Repeat instructions between the asterisks (*) for the rest of the round.
- You are crocheting in the round from the top of the hat down.
- The pattern is written in US crochet terms.
Magic Circle Alternative
If you’re not comfortable with using a magic circle, you can use an alternative method to make round 1 of the pattern. This method is just as effective and might be easier for beginners.
Round 1: Chain 4, make 11 dc in the 4th ch from the hook, join (11 stitches)
Crochet Wig Pattern Instructions
0-3 Month Baby Crochet Wig Hat Pattern
Rnd 1: Magic circle, ch 2, 11 dc, join (11 stitches)
Rnd 2: Ch 2, 2 dc in each st, join (22 stitches)
Rnd 3: Ch 2, *2 dc, dc in next st*, join (33 stitches)
Rnd 4: Ch 2, *2 dc, dc in next 2 sts*, join (44 stitches)
Rnd 5: Ch 2, *2 dc, dc in next 10 sts*, join (48 stitches)
Rnds 6-13: Ch 2, dc in each st, join (48 stitches)
Rnd 14: Ch 1, sc in each st, join (48 stitches)
3-6 Month Baby Crochet Wig Pattern
Rnd 1: Magic circle, ch 2, 11 dc, join (11 stitches)
Rnd 2: Ch 2, 2 dc in each st, join (22 stitches)
Rnd 3: Ch 2, *2 dc, dc in next st*, join (33 stitches)
Rnd 4: Ch 2, *2 dc, dc in next 2 sts*, join (44 stitches)
Rnd 5: Ch 2, *2 dc, dc in next 10 sts*, join (48 stitches)
Rnd 6: Ch 2, *2 dc, dc in next 11 sts*, join (52 stitches)
Rnds 7-15: Ch 2, dc in each st, join (52 stitches)
Rnd 16: Ch 1, sc in each st, join (52 stitches)
6-12 Month Baby Crochet Wig Pattern
Rnd 1: Magic circle, ch 2, 11 dc, join (11 stitches)
Rnd 2: Ch 2, 2 dc in each st, join (22 stitches)
Rnd 3: Ch 2, *2 dc, dc in next st*, join (33 stitches)
Rnd 4: Ch 2, *2 dc, dc in next 2 sts*, join (44 stitches)
Rnd 5: Ch 2, *2 dc, dc in next 10 sts*, join (48 stitches)
Rnd 6: Ch 2, *2 dc, dc in next 11 sts*, join (52 stitches)
Rnd 7: Ch 2, *2 dc, dc in next 12 sts*, join (56 stitches)
Rnds 8-16: Ch 2, dc in each st, join (56 stitches)
Rnd 17: Ch 1, sc in each st, join (56 stitches)
Toddler Size Crochet Wig Pattern
Rnd 1: Magic circle, ch 2, 11 dc, join (11 stitches)
Rnd 2: Ch 2, 2 dc in each st, join (22 stitches)
Rnd 3: Ch 2, *2 dc, dc in next st*, join (33 stitches)
Rnd 4: Ch 2, *2 dc, dc in next 2 sts*, join (44 stitches)
Rnd 5: Ch 2, *2 dc, dc in next 10 sts*, join (48 stitches)
Rnd 6: Ch 2, *2 dc, dc in next 11 sts*, join (52 stitches)
Rnd 7: Ch 2, *2 dc, dc in next 12 sts*, join (56 stitches)
Rnd 8: Ch 2, *2 dc, dc in next 13 sts*, join (60 stitches)
Rnds 9-18: Ch 2, dc in each st, join (60 stitches)
Rnd 19: Ch 1, sc in each st, join (60 stitches)
Child Size Crochet Wig Pattern
Rnd 1: Magic circle, ch 2, 11 dc, join (11 stitches)
Rnd 2: Ch 2, 2 dc in each st, join (22 stitches)
Rnd 3: Ch 2, *2 dc, dc in next st*, join (33 stitches)
Rnd 4: Ch 2, *2 dc, dc in next 2 sts*, join (44 stitches)
Rnd 5: Ch 2, *2 dc, dc in next 10 sts*, join (48 stitches)
Rnd 6: Ch 2, *2 dc, dc in next 11 sts*, join (52 stitches)
Rnd 7: Ch 2, *2 dc, dc in next 12 sts*, join (56 stitches)
Rnd 8: Ch 2, *2 dc, dc in next 13 sts*, join (60 stitches)
Rnd 9: Ch 2, *2 dc, dc in next 14 sts*, join (64 stitches)
Rnds 10-19: Ch 2, dc in each st, join (64 stitches)
Rn 20: Ch 1, sc in each st, join (64 stitches)
Adult Size Crochet Wig Pattern
Rnd 1: Magic circle, ch 2, 11 dc, join (11 stitches)
Rnd 2: Ch 2, 2 dc in each st, join (22 stitches)
Rnd 3: Ch 2, *2 dc, dc in next st*, join (33 stitches)
Rnd 4: Ch 2, *2 dc, dc in next 2 sts*, join (44 stitches)
Rnd 5: Ch 2, *2 dc, dc in next 10 sts*, join (48 stitches)
Rnd 6: Ch 2, *2 dc, dc in next 11 sts*, join (52 stitches)
Rnd 7: Ch 2, *2 dc, dc in next 12 sts*, join (56 stitches)
Rnd 8: Ch 2, *2 dc, dc in next 13 sts*, join (60 stitches)
Rnd 9: Ch 2, *2 dc, dc in next 14 sts*, join (64 stitches)
Rnd 10: Ch 2, *2 dc, dc in next 15 sts*, join (68 stitches)
Rnds 11-21: Ch 2, dc in each st, join (68 stitches)
Rnd 22: Ch 1, sc in each st, join (68 stitches)
Ponytail Instructions
Cut 36-inch strands of yarn. Lay them flat and tie a piece of yarn around the center to form the top of the ponytail. Sew the ponytail to the top of the hat.
Tie two more pieces of yarn around the ponytail further down and secure it to the side of the hat.
Bangs Instructions
Cut small strips of yarn. Tie the strands of yarn around the stitches on the last few rounds of the front half of the hat. Trim the yarn to the desired length.
Star Pattern
Use an H-8 5 mm crochet hook and red yarn.
Rnd 1: Ch 2, 5 sc in 2nd ch from hook, join (5 stitches)
Rnd 2: [ch 3, sl st in 2nd ch from hook, sc in next ch, sl st in next sc on round] x 5 times, join and fasten off
Ribbons Pattern
Use an H-8 5 mm crochet hook and blue yarn. Make 2.
Ch 20, dc in 3rd ch from hook and in each rem ch, fasten off
Attach the star and ribbons to the top of the ponytail.
Finishing the Crochet Wig Pattern
Weave in the ends.

Looking for More Free Crochet Patterns?
You may also like my baby witch costume, newborn hat, baby booties, cinderella baby costume, and my baby cardigan patterns.
Let’s Connect!
I’d love to hear from you. You can find me on social media: Instagram, Facebook, Pinterest, and my YouTube channel. Until then, happy crocheting!