
Crochet cupcake hat pattern
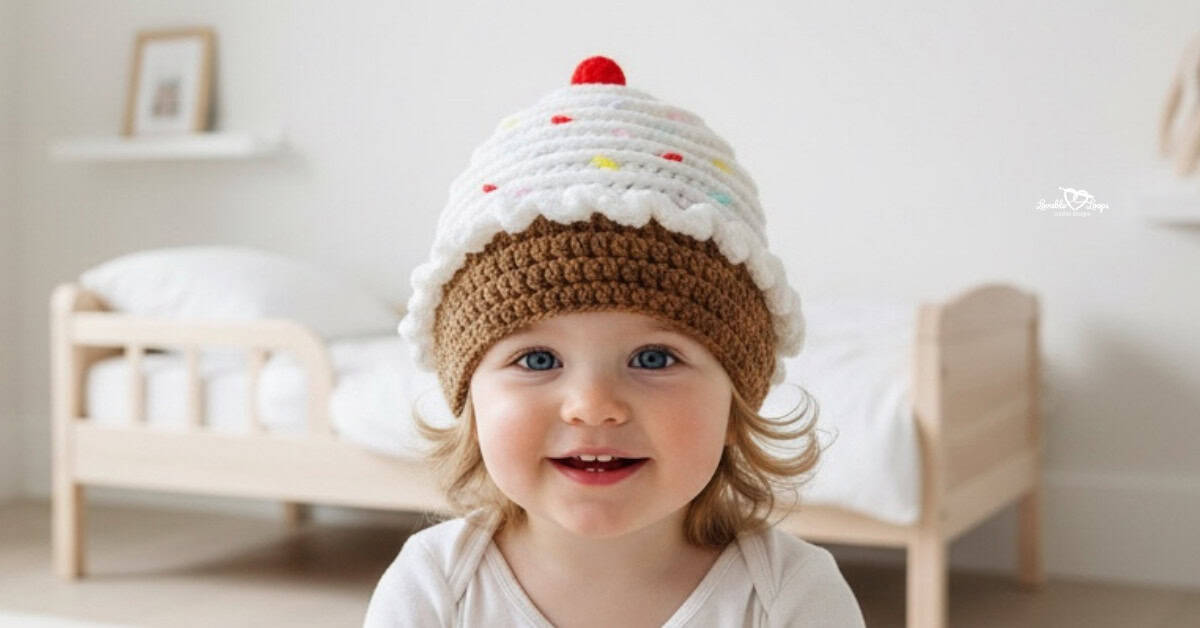
This free crochet cupcake hat pattern is a fun, beginner-friendly design made to look like a sweet cupcake topped with textured icing, colorful sprinkles, and a cherry. The pattern includes sizes from baby through adult, making it perfect for costumes, birthday parties, and playful photo props.
Worked in the round using basic stitches and simple repeats, this cupcake hat is enjoyable to make and easy to customize. Scroll down for the full written pattern, size chart, and finishing details.

Free crochet cupcake hat pattern details
Skill level
Beginner. This crochet cupcake hat pattern uses basic stitches and simple repeats.
Materials needed
- Crochet hook sizes:
I-9 5.5 mm (hat)
H-8 5 mm (cherry) - Yarn: worsted weight yarn in white, brown, and red, plus sprinkle color scraps (red, yellow, white, pink, mint, and purple)
- Yarn needle: Use this to weave in your ends.
- Scissors: Use scissors to fasten off your yarn.
- Stitch marker(s): These are great for beginners. They help to keep track of your stitches.
- Fiber fill: Used to stuff the cherry
Printable PDF version
View this crochet pattern in my Etsy Shop: crochet cupcake hat pattern
Size chart
This cupcake hat is designed for a comfortable fit, with sizes included for baby, toddler, child, and adult.
| Hat Size | Crown | Circumference | Height |
| Baby | 5 inches | 14-15 inches | 6 inches |
| Toddler | 5.75 inches | 18-19 inches | 7 inches |
| Child | 6.5 inches | 19-20 inches | 7.5 inches |
| Adult | 7 inches | 20-23 inches | 8 inches |
Gauge
17 stitches & 12 rounds = 4 inches
Crochet abbreviations
- dc = double crochet stitches
- FPdc = front post double crochet
- sc = single crochet stitches
- sc2tog = single crochet decrease
- ch/chs = chain/chains
- st/sts = stitch/stitches
- sl st = slip stitch
- rnd/rnds = round/rounds
- rem = remaining
- blo = back loop only
- ws/rs = wrong side/right side
Pattern notes
- Begin with a magic circle.
- The starting chain does not count as a stitch.
- Join each round with a slip stitch to the first stitch.
- The hat is worked from the top down in the round.
- When the icing section is finished, turn the hat inside out so the raised front post rounds face out.
- Repeat instructions between the asterisks (*) for the rest of the round.
- The pattern is written in US crochet terms.
Front post double crochet stitch
Front Post Double Crochet = FPdc
A front post double crochet (FPdc) is worked around the post of the stitch instead of the top loops. This creates the raised texture that forms the cupcake icing effect.
Crochet cupcake hat pattern instructions
Hook: I-9 (5.5 mm)
Notes: Rounds 1–6 are the same for all sizes. Begin with your icing color.
Icing section
Rounds 1–6 (all sizes)
Rnd 1: Magic circle, ch 2, 11 dc, join with sl st to the top of the first dc (11 stitches)
Rnd 2: Ch 2, 2 dc in each st, join (22 stitches)
Rnd 3: Ch 2, *2 FPdc, FPdc in next st*, join (33 stitches)
Rnd 4: Ch 2, *2 dc, dc in next 2 sts*, join (44 stitches)
Rnd 5: Ch 2, *2 FPdc, FPdc in next 10 sts*, join (48 stitches)
Rnd 6: Ch 2, *2 dc, dc in next 11 sts*, join (52 stitches)
Baby size
Icing section
Rnd 7: Ch 2, FPdc in each st, join (52 sts)
Rnd 8: Ch 2, dc in each st, join (52 sts)
Rnds 9–11: Repeat rounds 7 & 8
Rnd 12: Ch 2, 3 dc blo in each st, join and fasten off (156 sts)
Transition to cake section (read once)
Now that the icing section is complete, it’s time to crochet the cake portion of the hat.
The front post rounds create raised stitches on the wrong side of the hat. Turn your hat inside out. The raised rounds are now on the right side and are meant to look like layers of icing. Join your cake color yarn.
Cake section (baby size)
Rnd 13: Working in the unworked loop from round 12, ch 2, dc in each st, join (64 sts)
Rnds 14–16: Ch 2, dc in each st, join (52 sts)
Fasten off and weave in your ends.
Toddler size
Icing section
Rnd 7: Ch 2, *2 FPdc, FPdc in next 12 sts*, join (56 sts)
Rnd 8: Ch 2, dc in each st, join (56 sts)
Rnd 9: Ch 2, FPdc in each st, join (56 sts)
Rnds 10–18: Repeat rounds 8 & 9
Rnd 19: Ch 2, 3 dc blo in each st, join and fasten off (168 sts)
Cake section
Rnd 20: Working in the unworked loop from round 19, ch 2, dc in each st, join (64 sts)
Rnds 21–23: Ch 2, dc in each st, join (56 sts)
Fasten off and weave in your ends.
Child size
Icing section
Rnd 7: Ch 2, *2 FPdc, FPdc in next 12 sts*, join (56 sts)
Rnd 8: Ch 2, *2 dc, dc in next 13 sts*, join (60 sts)
Rnd 9: Ch 2, FPdc in each st, join (60 sts)
Rnd 10: Ch 2, dc in each st, join (60 sts)
Rnds 11–19: Repeat rounds 9 & 10
Rnd 20: Ch 2, 3 dc blo in each st, join and fasten off (180 sts)
Cake section
Rnd 21: Working in the unworked loop from round 20, ch 2, dc in each st, join (64 sts)
Rnds 22–24: Ch 2, dc in each st, join (60 sts)
Fasten off and weave in your ends.
Adult size
Icing section
Rnd 7: Ch 2, *2 FPdc, FPdc in next 12 sts*, join (56 sts)
Rnd 8: Ch 2, *2 dc, dc in next 13 sts*, join (60 sts)
Rnd 9: Ch 2, *2 FPdc, FPdc in next 14 sts*, join (64 sts)
Rnd 10: Ch 2, dc in each st, join (64 sts)
Rnd 11: Ch 2, FPdc in each st, join (64 sts)
Rnds 12–20: Repeat rounds 10 & 11
Rnd 21: Ch 2, 3 dc blo in each st, join and fasten off (192 sts)
Cake section
Rnd 22: Working in the unworked loop from round 21, ch 2, dc in each st, join (64 sts)
Rnds 23–25: Ch 2, dc in each st, join (64 sts)
Fasten off and weave in your ends.
Parts of the crochet cupcake hat pattern
This crochet cupcake hat is made up of a few simple decorative elements. The main hat instructions are the same for all sizes unless noted. Use the sections below to add sprinkles and a cherry to finish your hat.
Sprinkles
- Cut short strips of sprinkle-colored yarn.
(I used red, yellow, white, pink, mint, and purple.) - Thread a yarn needle and sew the yarn pieces onto the hat to create sprinkle details.
- Secure each piece on the inside of the hat and trim any excess yarn.
Tip: Scatter the sprinkles randomly for a more playful, realistic look.
Cherry
Hook: H-8 (5 mm)
Yarn: Red
Other materials: Fiber fill
Rnd 1: Magic circle, ch 1, 4 sc, join with sl st to the first sc (4 sts)
Rnd 2: Ch 1, 2 sc in each st, join (8 sts)
Rnd 3: Ch 1, *2 sc, sc in next st*, join (12 sts)
Rnd 4: Ch 1, *sc2tog, sc in next st*, join (8 sts)
Rnd 5: Ch 1, sc2tog around, join (4 sts)
Lightly stuff the cherry with fiber fill. Fasten off, pull the remaining stitches closed, and sew the cherry to the top of the cupcake hat.
Finishing the crochet cupcake hat
- Weave in all remaining ends.
- Make sure all sprinkles and the cherry are securely attached before wearing.
Frequently asked questions
Is this a beginner-friendly crochet cupcake hat pattern?
Yes. This crochet cupcake hat pattern is beginner friendly and uses basic stitches worked in the round with simple repeats. The textured icing is created with front post double crochet stitches, which are easy to learn.
What sizes are included in this crochet cupcake hat pattern?
The pattern includes sizes for baby, toddler, child, and adult. A full size chart is included to help you choose the best fit.
What yarn should I use for the crochet cupcake hat?
This pattern uses worsted weight (#4) yarn. You’ll need white, brown, and red yarn, along with small amounts of scrap yarn for the sprinkles.
Is this hat worked in the round or flat?
The hat is worked in the round and joined at the end of each round with a slip stitch.
Why do I need to turn the hat inside out during the pattern?
The front post stitches create raised texture on the wrong side of the fabric. Turning the hat inside out places those raised stitches on the right side so they look like layered cupcake icing.
Are the sprinkles and cherry required?
No. The sprinkles and cherry are optional decorative elements. You can customize your cupcake hat by adding both, one, or neither.

Free crochet hat patterns
Love making cozy hats? Explore even more free crochet hat and beanie patterns that are perfect for every season and style. From classic beanies and warm winter hats to playful designs for kids and trendy accessories for adults, you’ll find inspiration for your next project here.


Let’s connect!
I’d love to see what you’re making! Share your finished project and follow along for more free crochet patterns and tutorials.
📌 Don’t forget to pin this pattern for later!
Happy crocheting! 🧶
— Melissa