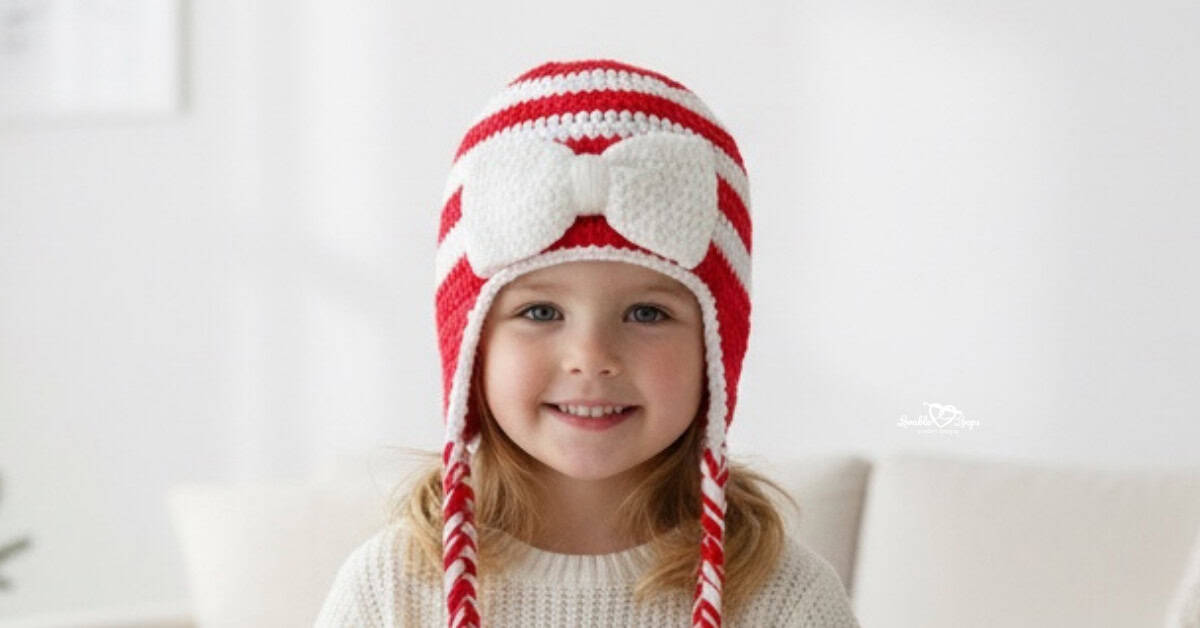
Striped crochet hat pattern
I’m super excited to share my Candy Cane Striped Crochet Hat pattern with you! This festive hat is perfect for adding some holiday cheer to your wardrobe. Designed for all sizes, from babies to adults, it’s great for everyone in the family.
Let’s get into the holiday spirit and crochet this adorable hat together! It’s sure to be a hit at any festive gathering. The free crochet pattern is below.

Striped crochet hat pattern details
Skill level
Beginner. This crochet hat pattern uses basic stitches in basic form and in simple repeats in rounds.
Materials needed
- Crochet hook size:
I-9 5.5 mm crochet hook (hat)
H-8 5 mm crochet hook (bow) - Yarn: worsted worsted weight yarn #4
- Yarn needle: Use this to weave in your ends.
- Scissors: Use scissors to fasten off your yarn.
- Stitch marker(s): Optional. Use these to help keep track of your stitches.
- Large Pom Pom Maker: To make a pom for your hat.
PDF Version
View this pattern in my Etsy shop: Candy Cane Striped Crochet Hat Pattern
Finished size
| Hat Size | Crown | Circumference | Height |
| 0-3 Months | 4.5 inches | 13-14 inches | 5 inches |
| 3-6 Months | 5 inches | 14-15 inches | 5.5 inches |
| 6-12 Months | 5.5 inches | 16-17 inches | 6.25 inches |
| Toddler | 6 inches | 18-19 inches | 6.75 inches |
| Child | 6.5 inches | 19-20 inches | 7 inches |
| Adult | 7 inches | 20-23 inches | 7.75 inches |
Gauge
15 stitches and 10 rows = 4″
Crochet abbreviations
- dc = double crochet
- hdc = half double crochet stitch
- sc = single crochet stitch
- sc2tog = single crochet decrease
- ch/chs = chain/chains
- st/sts = stitch/stitches
- rnd/rnd = round/rounds
- sl st = slip stitch
- rem = remaining
Pattern notes
- This crochet beanie pattern starts with a magic circle.
- Start with white yarn and alternate with red or green every two rounds.
- Instructions for the earflaps, braids, pom pom, and bow are provided after the hat patterns.
- The chain at the beginning of each round does not count as your first stitch.
- Join each round with a slip stitch to the first stitch made in that round.
- Repeat instructions between the asterisks (*) for the rest of the round.
- You are crocheting in the round from the top of the hat down.
- The pattern is written in US terms.
Striped crochet hat pattern instructions
0-3 months size
Rnd 1: Magic circle, ch 2, 11 dc, join (11 stitches)
Rnd 2: Ch 2, 2 dc in each st, join (22 stitches)
Rnd 3: Ch 2, *2 dc, dc in next st*, join (33 stitches)
Rnd 4: Ch 2, *2 dc, dc in next 2 sts*, join (44 stitches)
Rnd 5: Ch 2, *2 dc, dc in next 10 sts*, join (48 stitches)
Rnd 6: Ch 2, dc in each st, join (48 stitches)
Rnds 7–13: Repeat round 6 (48 stitches)
3-6 months size
Rnd 1: Magic circle, ch 2, 11 dc, join (11 stitches)
Rnd 2: Ch 2, 2 dc in each st, join (22 stitches)
Rnd 3: Ch 2, *2 dc, dc in next st*, join (33 stitches)
Rnd 4: Ch 2, *2 dc, dc in next 2 sts*, join (44 stitches)
Rnd 5: Ch 2, *2 dc, dc in next 10 sts*, join (48 stitches)
Rnd 6: Ch 2, *2 dc, dc in next 11 sts*, join (52 stitches)
Rnd 7: Ch 2, dc in each st, join (52 stitches)
Rnds 8–15: Repeat round 7 (52 stitches)
6-12 months size
Rnd 1: Magic circle, ch 2, 11 dc, join (11 stitches)
Rnd 2: Ch 2, 2 dc in each st, join (22 stitches)
Rnd 3: Ch 2, *2 dc, dc in next st*, join (33 stitches)
Rnd 4: Ch 2, *2 dc, dc in next 2 sts*, join (44 stitches)
Rnd 5: Ch 2, *2 dc, dc in next 10 sts*, join (48 stitches)
Rnd 6: Ch 2, *2 dc, dc in next 11 sts*, join (52 stitches)
Rnd 7: Ch 2, *2 dc, dc in next 12 sts*, join (56 stitches)
Rnd 8: Ch 2, dc in each st, join (56 stitches)
Rnds 9–16: Repeat round 8 (56 stitches)
Toddler size
Rnd 1: Magic circle, ch 2, 11 dc, join (11 stitches)
Rnd 2: Ch 2, 2 dc in each st, join (22 stitches)
Rnd 3: Ch 2, *2 dc, dc in next st*, join (33 stitches)
Rnd 4: Ch 2, *2 dc, dc in next 2 sts*, join (44 stitches)
Rnd 5: Ch 2, *2 dc, dc in next 10 sts*, join (48 stitches)
Rnd 6: Ch 2, *2 dc, dc in next 11 sts*, join (52 stitches)
Rnd 7: Ch 2, *2 dc, dc in next 12 sts*, join (56 stitches)
Rnd 8: Ch 2, *2 dc, dc in next 13 sts*, join (60 stitches)
Rnd 9: Ch 2, dc in each st, join (60 stitches)
Rnds 10–18: Repeat round 9 (60 stitches)
Child size
Rnd 1: Magic circle, ch 2, 11 dc, join (11 stitches)
Rnd 2: Ch 2, 2 dc in each st, join (22 stitches)
Rnd 3: Ch 2, *2 dc, dc in next st*, join (33 stitches)
Rnd 4: Ch 2, *2 dc, dc in next 2 sts*, join (44 stitches)
Rnd 5: Ch 2, *2 dc, dc in next 10 sts*, join (48 stitches)
Rnd 6: Ch 2, *2 dc, dc in next 11 sts*, join (52 stitches)
Rnd 7: Ch 2, *2 dc, dc in next 12 sts*, join (56 stitches)
Rnd 8: Ch 2, *2 dc, dc in next 13 sts*, join (60 stitches)
Rnd 9: Ch 2, *2 dc, dc in next 14 sts*, join (64 stitches)
Rnd 10: Ch 2, dc in each st, join (64 stitches)
Rnds 11–19: Repeat round 10 (64 stitches)
Adult size
Rnd 1: Magic circle, ch 2, 11 dc, join (11 stitches)
Rnd 2: Ch 2, 2 dc in each st, join (22 stitches)
Rnd 3: Ch 2, *2 dc, dc in next st*, join (33 stitches)
Rnd 4: Ch 2, *2 dc, dc in next 2 sts*, join (44 stitches)
Rnd 5: Ch 2, *2 dc, dc in next 10 sts*, join (48 stitches)
Rnd 6: Ch 2, *2 dc, dc in next 11 sts*, join (52 stitches)
Rnd 7: Ch 2, *2 dc, dc in next 12 sts*, join (56 stitches)
Rnd 8: Ch 2, *2 dc, dc in next 13 sts*, join (60 stitches)
Rnd 9: Ch 2, *2 dc, dc in next 14 sts*, join (64 stitches)
Rnd 10: Ch 2, *2 dc, dc in next 15 sts*, join (68 stitches)
Rnd 11: Ch 2, dc in each st, join (68 stitches)
Rnds 12–21: Repeat round 11 (68 stitches)
Earflaps instructions
Begin the first earflap where you ended the last round of your hat. Then, refer to the chart and image below for placement of the second earflap.
Repeat the instructions for the second earflap. Then single crochet around the entire hat and both earflaps.
| Size | Front of Hat | Back of Hat |
| 0-3 Months | leave 16 stitches in front | leave 12 stitches in back |
| 3-6 Months | leave 16 stitches in front | leave 12 stitches in back |
| 6-12 Months | leave 18 stitches in front | leave 14 stitches in back |
| Toddler | leave 18 stitches in front | leave 14 stitches in back |
| Child | leave 20 stitches in front | leave 16 stitches in back |
| Adult | leave 22 stitches in front | leave 18 stitches in back |
0-3 months size earflaps
Row 1: Ch 1, sc in 10 sts, turn (10 stitches)
Row 2: Ch 1, sc2tog, sc in 6 sts, sc2tog, turn (8 stitches)
Row 3: Ch 1, sc in each st, turn (8 stitches)
Row 4: Ch 1, sc2tog, sc in 4 sts, sc2tog, turn (6 stitches)
Row 5: Ch 1, sc in each st, turn (6 stitches)
Row 6: Ch 1, sc2tog, sc in 2 sts, sc2tog, turn (4 stitches)
Row 7: Ch 1, sc in each st, turn (4 stitches)
Row 8: Ch 1, sc2tog, sc2tog, turn (2 stitches)
Row 9: Ch 1, sc2tog (1 stitch)
3-6 and 6-12 months size earflaps
Row 1: Ch 1, sc in 12 sts, turn (12 stitches)
Row 2: Ch 1, sc2tog, sc in 8 sts, sc2tog, turn (10 stitches)
Row 3: Ch 1, sc in each st, turn (10 stitches)
Row 4: Ch 1, sc2tog, sc in 6 sts, sc2tog, turn (8 stitches)
Row 5: Ch 1, sc in each st, turn (8 stitches)
Row 6: Ch 1, sc2tog, sc in 4 sts, sc2tog, turn (6 stitches)
Row 7: Ch 1, sc in each st, turn (6 stitches)
Row 8: Ch 1, sc2tog, sc in 2 sts, sc2tog, turn (4 stitches)
Row 9: Ch 1, sc in each st, turn (4 stitches)
Row 10: Ch 1, sc2tog, sc2tog, turn (2 stitches)
Row 11: Ch 1, sc2tog (1 stitch)
Toddler, child, and adult size earflaps
Row 1: Ch 1, sc in 14, turn (14 stitches)
Row 2: Ch 1, sc2tog, sc in 10 sts, sc2tog, turn (12 stitches)
Row 3: Ch 1, sc in each st, turn (12 stitches)
Row 4: Ch 1, sc2tog, sc in 8 sts, sc2tog, turn (10 stitches)
Row 5: Ch 1, sc in each st, turn (10 stitches)
Row 6: Ch 1, sc2tog, sc in 6 sts, sc2tog, turn (8 stitches)
Row 7: Ch 1, sc in each st, turn (8 stitches)
Row 8: Ch 1, sc2tog, sc in 4 sts, sc2tog, turn (6 stitches)
Row 9: Ch 1, sc in each st, turn (6 stitches)
Row 10: Ch 1, sc2tog, sc in 2 sts, sc2tog, turn (4 stitches)
Row 11: Ch 1, sc in each st, turn (4 stitches)
Row 12: Ch 1, sc2tog, sc2tog, turn (2 stitches)
Row 13: Ch 1, sc2tog (1 stitch)
Adding braids
Cut twelve 30” strands of yarn for each braid.
- Fold the strands in half and pass the folded loop through the bottom of the ear flap.
- Pass the strand ends through the loop and pull tight to form a knot.
- Divide into three sections and braid.
Adding a Pom Pom
Use your pom maker.
- Wind the yarn around both arches.
- Cut the yarn along the middle gap.
- Tie with a piece of scrap yarn.
- Open the arches and remove the pom pom.
- Trim any loose ends.
Attach the pom to the top of your hat.
Adding a bow
Use an H-8 5 mm size crochet hook.
0-3, 3-6, and 6-12 months size bow
Ch 40 and join in the round.
Rnd 1: ch 1, hdc in each chain, join (40 stitches)
Rnds 2-8: ch 1, hdc in each st, join (40 stitches)
Fasten off leaving a very long yarn tail.
Toddler, child, and adult size bow
Ch 45 and join in the round.
Rnd 1: ch 1, hdc in each chain, join (45 stitches)
Rnds 2-8: ch 1, hdc in each st, join (45 stitches)
Fasten off leaving a very long yarn tail.
How to adjust the size of the bow
You can easily make the bow bigger or smaller by changing the starting chain and the number of rounds.
To make the bow wider:
Add more chains at the beginning.
To make the bow narrower:
Use fewer starting chains.
To make the bow taller or fuller:
Add more rounds.
To make the bow shorter or less full:
Work fewer rounds.
Bow Assembly
- Use a tapestry needle to weave yarn back and forth down the middle of the bow, then gently pull the yarn tight to “scrunch” up the middle.
- Wrap the yarn tail around the middle until you are happy with the look of your bow.
- Secure the yarn tail in the back of the bow to prevent the middle section from unraveling.
- Use the remainder of the yarn tail to sew the bow onto the front of the hat.
Finishing
Weave in your ends.

More free crochet hat patterns
Looking for more crochet hat ideas? Browse my full collection of free crochet hat patterns for babies, kids, and adults. You’ll find everything from classic crochet beanies and cozy winter hats to playful animal hats and seasonal designs — all written with clear instructions and helpful sizing details.


Let’s connect!
I’d love to see what you’re making! Share your finished project and follow along for more free crochet patterns and tutorials.
📌 Don’t forget to pin this pattern for later!
Happy crocheting! 🧶
— Melissa