
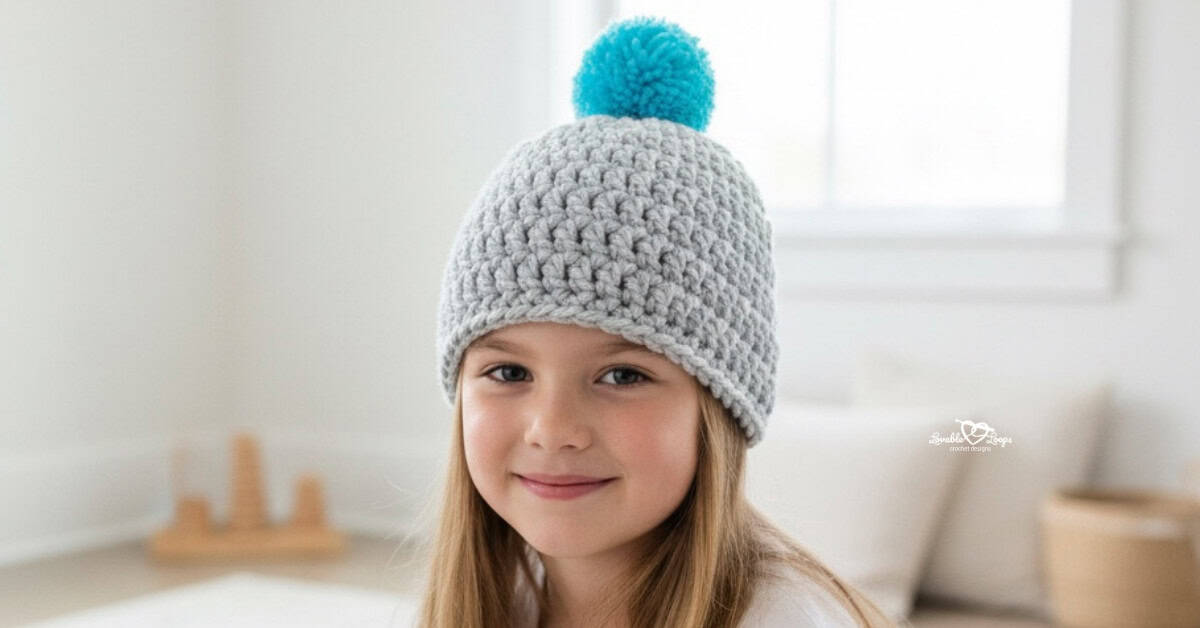
Super bulky crochet hat pattern
This super bulky crochet hat pattern is a beginner-friendly beanie worked from the top down in the round using super bulky yarn for extra warmth and a quick finish. With baby, child, and adult sizes, it’s a cozy cold-weather hat that works up fast and is great for gifts or easy winter projects.
Quick answer
This super bulky crochet hat pattern is a beginner-friendly beanie worked from the top down in the round using super bulky weight yarn (#6) and an M/N-13 (9 mm) crochet hook. It includes baby, child, and adult sizes and can be finished with an optional pom pom.
Best for: Beginners
Style: Top-down super bulky crochet beanie
Includes: 3 sizes, written instructions, gauge, and finishing options
Super bulky crochet hat pattern details
Here’s a quick overview of the materials, sizing, gauge, and pattern notes before you begin.
Skill level
Beginner — Uses basic crochet stitches worked in simple rounds.
Materials needed
- Crochet hook size M/N-13 (9 mm)
- Super bulky weight yarn (#6) — for the hat
- Worsted weight yarn (#4) — for the pom pom
- Yarn needle — for weaving in ends
- Scissors — to cut your yarn
- Stitch markers — optional, but helpful for keeping track of stitches
- Large pom pom maker — to make a pom pom for your hat
Finished size
| Size | Crown | Circumference | Height |
| Baby | 5 inches | 13-14 inches | 6 inches |
| Child | 6.5 inches | 18-20 inches | 7.5 inches |
| Adult | 7.5 inches | 20-22 inches | 8.5 inches |
If you need help choosing the right fit, visit my crochet hat sizing guide for head circumference tips and size charts.
Gauge
9 stitches and 6 rows = 4 inches (10 cm)
Crochet abbreviations
- dc = double crochet stitch
- sc = single crochet stitch
- ch/chs = chain/chains
- st/sts = stitch/stitches
- sl st = slip stitch
- rnd/rnds = round/rounds
- rnds = rounds
- rem = remaining
Pattern notes
- The chain at the beginning of each round does not count as your first stitch.
- Join each round with a slip stitch to the first stitch made in that round.
- Repeat instructions between the asterisks (*) for the rest of the round.
- You are crocheting in the round from the top of the hat down.
- The pattern is written in US crochet terms.
Magic circle alternative
If you prefer not to use a magic circle, you can start round 1 this way instead:
Round 1: Chain 4, make 11 dc in the 4th ch from the hook, join (11 stitches)

Super bulky beanie pattern
Below are the step-by-step instructions for crocheting this super bulky beanie.
Baby size
Rnd 1: Magic circle, ch 2, 11 dc, join (11)
Rnd 2: ch 2, 2 dc in each st, join (22)
Rnd 3: ch 2, *2 dc, dc in next st*, join (33)
Rnds 4– 8: ch 2, dc in each st, join (33)
Rnd 9: ch 1, sc in each st, join, fasten off and weave in ends (33)
Child size
Rnd 1: Magic circle, ch 2, 11 dc, join (11)
Rnd 2: ch 2, 2 dc in each st, join (22)
Rnd 3: ch 2, *2 dc, dc in next st*, join (33)
Rnd 4: ch 2, *2 dc, dc in next 2 sts*, join (44)
Rnds 5– 10: ch 2, dc in each st, join (44)
Rnd 11: ch 1, sc in each st, join, fasten off and weave in ends (44)
Adult size
Rnd 1: Magic circle, ch 2, 11 dc, join (11)
Rnd 2: ch 2, 2 dc in each st, join (22)
Rnd 3: ch 2, *2 dc, dc in next st*, join (33)
Rnd 4: ch 2, *2 dc, dc in next 2 sts*, join (44)
Rnd 5: ch 2, *2 dc, dc in next 10 sts*, join (48)
Rnds 6– 11: ch 2, dc in each st, join (48)
Rnd 12: ch 1, sc in each st, join, fasten off and weave in ends (48)
Adding a pom pom
Use your pom maker.
- Wind the yarn around both arches.
- Cut the yarn along the middle gap.
- Tie with a piece of scrap yarn.
- Open the arches and remove the pom pom.
- Trim any loose ends.
Attach the pom to the top of your hat.
Finishing
Weave in your ends.
PDF version
View this pattern in my Etsy shop: Super bulky crochet hat pattern
Video tutorial
In this tutorial I show you how to crochet a super bulky crochet hat in all sizes, baby-adult.


More free crochet hat patterns
Looking for more crochet hat ideas? Browse my full collection of free crochet hat patterns for babies, kids, and adults. You’ll find everything from classic crochet beanies and cozy winter hats to playful animal hats and seasonal designs — all written with clear instructions and helpful sizing details.


Let’s connect!
I’d love to see what you’re making! Share your finished project and follow along for more free crochet patterns and tutorials.
📌 Don’t forget to pin this pattern for later!
Happy crocheting! 🧶
— Melissa