
Crochet Easter basket pattern
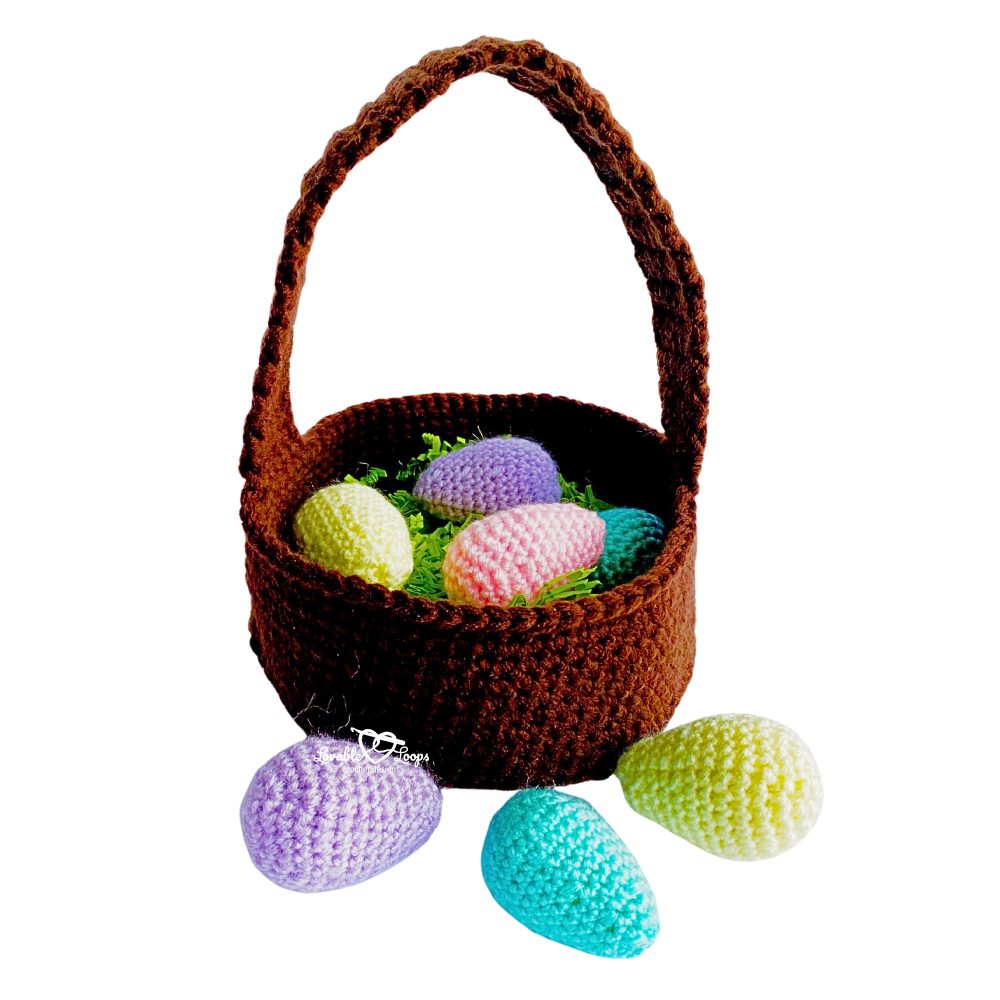
Looking for a sweet, handmade way to celebrate Easter? This crochet Easter basket pattern is designed just for kids and includes both the basket and matching crochet eggs. It’s worked in the round from the bottom up using worsted weight yarn and simple stitches, making it a fun and approachable project for beginners.
With its playful Easter vibe and included video tutorial, this pattern is perfect for holiday decor, handmade gifts, or filling with crocheted eggs for an extra-special touch.
Quick answer
This crochet Easter basket pattern is a beginner-friendly design worked in the round from the bottom up. It includes instructions for both the basket and matching crochet eggs, plus a video tutorial to help guide you along.

Why you’ll love this pattern
- Beginner-friendly — Uses basic stitches and simple repeats
- Two patterns in one — Includes both the basket and crochet eggs
- Video tutorial included — Extra support for visual learners
- Perfect for Easter — A playful project designed with kids in mind
- Reusable decor — Bring it out year after year for Easter celebrations
What’s included in this crochet Easter basket pattern
This pattern includes instructions for a sturdy crochet Easter basket and a set of matching crochet eggs. The basket is worked with two strands of yarn held together for added structure, while the eggs are quick to make and lightly stuffed with fiber fill.
Having both pieces in one pattern makes it easy to create a complete Easter set that works beautifully for decorating, gifting, or pretend play.
Crochet Easter basket pattern details
Skill level
Beginner — This crochet Easter basket pattern uses basic stitches worked in simple repeats, in the round and in rows.
If you’re new to crochet, my how to single crochet tutorial walks you through the single crochet stitch step by step with helpful visuals.
Materials needed
- Crochet hooks — J-10 (6 mm) for the basket and 7 (4.5 mm) for the eggs.
- Worsted weight yarn (#4) — brown (2 strands held together) for the basket and pastel colors for the eggs.
- Fiber fill — Use this to stuff the Easter eggs.
- Yarn needle — Use this to weave in your ends.
- Scissors — Use scissors to fasten off your yarn.
- Stitch marker(s) — Optional. Use these to help keep track of your stitches.
Finished size
The finished sizes below will help you understand the scale of each piece before you begin.
- Crochet Easter basket — 7.75 inches wide (20 cm), 3.5 inches to brim (9 cm), 10.5 inches to top of handle (27 cm)
- Crochet Easter eggs — 1.5 inches wide (4 cm), 2.5 inches tall (6 cm)

Gauge
Easter Basket: 8 rows & 7 stitches = 2 inches
Easter Eggs: 6 rows & 7 stitches = 1 inch
Crochet abbreviations
- sc = single crochet stitch
- sc2tog = single crochet 2 stitches together
- ch/chs = chain/chains
- st/sts = stitch/stitches
- sl st = slip stitch
- rnd/rnds = round
- rem = remaining
- blo = back loop only
Pattern notes
- The Easter basket is made with two strands of yarn held together.
- This pattern starts with a magic circle.
- The beginning of each round/row starts with a chain which does not count as your first stitch.
- Join in the round with a slip stitch to the first stitch made in that round.
- Repeat instructions between asterisks (*) for the remainder of the round.
- You are crocheting in the round.
- Basket is worked from the bottom up.
Free crochet Easter basket pattern instructions
- Use 2 strands of brown yarn held together
Round 1: Magic circle, ch 1, 6 sc, join with sl st in top of first sc (6)
Round 2: Ch 1, 2 sc in each st, join (12)
Round 3: Ch 1, *2 sc in the first stitch, sc in next st*, join (18)
Round 4: Ch 1, *2 sc in the first st, sc in next 2 sts*, join (24)
Round 5: Ch 1, *2 sc in the first st, sc in next 3 sts*, join (30)
Round 6: Ch 1, *2 sc in the first st, sc in next 4 sts*, join (36)
Round 7: Ch 1, *2 sc in the first st, sc in next 5 sts*, join (42)
Round 8: Ch 1, *2 sc in the first st, sc in next 6 sts*, join (48)
Round 9: Ch 1, *2 sc in the first st, sc in next 7 sts*, join (54)
Round 10: Ch 1, *2 sc in the first st, sc in next 8 sts*, join (60)
Round 11: Ch 1, *2 sc in the first st, sc in next 9 sts*, join (66)
Round 12: Ch 1, *2 sc in the first st, sc in next 10 sts*, join (72)
Round 13: Ch 1, sc in each st in the back loop only, join (72)
Rounds 14- 22: Ch 1, sc in each st, join (72)
Do not fasten off. Begin the basket handle where you left off after round 21
Adding the basket handle
Row 1: Ch 1, sc in 6 sts, turn (6)
Rows 2-51: Ch 1, sc in 6 sts, turn (6)
Make your handle about 14 inches long. Use a yarn needle to sew it to the 6 stitches on the opposite side of the basket, leaving 30 stitches between each end of the handle.
Finishing the basket
Once the handle is attached, fasten off and use a yarn needle to weave in all loose ends securely. Gently shape the basket with your hands to even out the stitches and help it hold its shape. Your crochet Easter basket is now ready to be filled with the handmade eggs or used as a festive holiday decoration.
Crochet Easter eggs video tutorial
Prefer to learn by watching? This step-by-step video tutorial walks you through how to crochet the Easter eggs included in this pattern. It’s especially helpful for beginners and visual learners, showing the shaping, decreases, and stuffing process clearly from start to finish.
The basket instructions are written only, but the egg tutorial makes it easy to complete the full Easter set with confidence.

Crochet Easter egg pattern instructions
The crochet Easter eggs are made using a 7 (4.5 mm) crochet hook and worsted weight yarn, then lightly stuffed with fiber fill to give them their classic egg shape. These small, quick stitches work up fast and are perfect for filling your Easter basket with colorful handmade eggs.
Round 1: Magic circle, ch 1, 6 sc, join with sl st in top of first sc (6)
Round 2: ch 1, 2 sc in each st, join (12)
Round 3: ch 1, *2 sc in the first stitch, sc in next st*, join (18)
Round 4: ch 1, *2 sc in the first st, sc in next 2 sts*, join (24)
Round 5: ch 1, *2 sc in the first st, sc in next 3 sts*, join (30)
Round 6: ch 1, sc in each st, join (30)
Round 7: ch 1, *sc2tog, sc in next 3 sts*, join (24)
Round 8: ch 1, sc in each st, join (24)
Round 9: ch 1, sc in each st, join (24)
Round 10: ch 1, *sc2tog, sc in next 2 sts*, join (18)
Round 11: ch 1, sc in each st, join (18)
Round 12: ch 1, sc in each st, join (18)
Stuff with fiber fill.
Round 13: ch 1, *sc2tog, sc in the next st*, join (12)
Round 14: ch 1, sc in each st, join (12)
Round 15: ch 1, *sc2tog*, join (6)
Use a yarn needle to sew the remaining 6 stitches together.
Finishing the eggs
Once the eggs are fully crocheted, add fiber fill to shape them evenly, then close the opening and secure the stitches. Finish by weaving in all ends neatly so your crochet Easter eggs are smooth, sturdy, and ready to display or tuck inside the basket.
Crochet Easter basket pattern FAQs
Is this crochet Easter basket pattern beginner-friendly?
Yes. This pattern is beginner-friendly and uses basic stitches with simple construction.
Does this pattern include the crochet eggs?
Yes. The pattern includes instructions for both the crochet Easter basket and matching crochet eggs.
Is there a video tutorial included?
Yes. A video tutorial is included to help guide you through the crochet egg portion of the pattern.
What yarn works best for this crochet Easter basket pattern?
Worsted weight yarn (#4) is used for both the basket and the eggs.
Can I use this pattern to make gifts or sell finished items?
Yes, you may sell finished items made from this pattern. Please do not sell or redistribute the pattern itself.
More spring crochet ideas
Looking for more seasonal projects to crochet? This section is full of cheerful spring crochet ideas, including Easter-themed patterns and kid-friendly designs that are perfect for decorating, gifting, or adding a handmade touch to the season.


Let’s connect!
I’d love to see what you’re making! Share your finished project and follow along for more free crochet patterns and tutorials.
📌 Don’t forget to pin this pattern for later!
Happy crocheting! 🧶
— Melissa